LogoLogo
API DocsChangelogPlaybooksLoginBook a Demo
  • Getting Started
    • Introduction to Reo.Dev
    • For Users
      • Step 1: Find active accounts to target
      • Step 2: Track developer activity on your target accounts
      • Step 3: Identify developers engaging with your product
      • Step 4: Build custom segments that are most likely to convert
      • Step 5: Use filters to spot high-intent leads
    • For Admins
      • Step 1: Identify active accounts to target
      • Step 2: Track developer activity on your target accounts
      • Step 3: Find developers engaging with your product
      • Step 4: Create custom segments that are most likely to convert
      • Step 5: Integrating data sources with Reo.Dev
      • Step 6: Integrate Slack and set up notifications
      • Step 7: Add Customer Fit Criteria
  • Accounts
    • Account Lifecycle Stage
    • Custom CRM Stages
    • Developer Funnel Stages
    • Account Activity Score
    • Tags
    • Customizing Tags
    • Custom Lists
    • Using the Lists API in Reo.Dev
    • Managing CRM Owners in Reo.Dev
    • Follow an Account
    • How to Set Up Notification Alerts for Accounts, Developers & Segments in Reo.Dev
    • Flag incorrect data
  • Developers
    • Interpreting Intel on the Developer view page
    • Developer Activity Score
    • How to Find Inbound Developers in Reo.Dev
  • Segments
    • Creating Segments
    • Basic & Advance Segments
    • Filters 101
    • Segment Actions
    • My Segments
    • Shared Segments
    • Magic Segments
    • Favourite Segment
    • Add notes for better collaboration and context
    • CSV Exports for Segments
    • 10 Advanced Segments to create to spot high-intent opportunities
  • Buyers
    • Find Buyer Contact
    • How to Find, Segment & Engage Decision-Makers in Reo.Dev’s Buyer Section
    • Buyer Persona Configuration in Reo.Dev
  • Enrichment
    • Enrichment
  • Audiences
    • Buyer Audience
  • Integrations
    • Connect GitHub repositories
    • Reo.Dev Zapier Integration Guide
    • Webhooks
    • Developer Docs
      • Docusaurus
      • GitBook
    • CRM
      • HubSpot
      • Salesforce
      • Pipedrive
      • Zoho
      • Freshworks
      • Leadsquared
    • Tracking Beacon
      • Install JavaScript for Documentation
      • Install JavaScript for Product
      • Install JavaScript in Website
      • Install JavaScript in Local Product
      • Track Code Interactions
      • Install JavaScript for Documentation through Google Tag Manager
      • Reo.Dev JavaScript Cookies and Consent Guide
    • Product Usage API
      • Overview
      • How to Configure Product Usage Metrics in Settings
      • Telemetry Data
      • Product API
      • Examples of Product Usage Metrics
      • Data Collected for Product Usage
    • Communities
      • Open Communities
      • Owned Communities
        • Slack
        • LinkedIn Company Page
    • Email
      • Apollo.io
      • How to Integrate and Use Outreach.io with Reo.Dev
      • How to Integrate and Use Salesloft with Reo.Dev
    • Website Tracking
      • RB2B
  • Analytics
    • Impact Dashboard
  • Campaigns
    • Run bulk email campaigns
    • Testing Your Email Integration with Reo.Dev
  • Settings
    • Add Customer Fit Score Criteria
    • Add Firmographic and Technographic Filters
    • Configure Slack & Email Notifications
  • Account and Contact Usage Limit
    • Manage Account and Contact Limit Usage
  • User Management
    • Invite a teammate to Reo.Dev
    • Manage CRM Permissions
    • Roles and Permissions: Admin vs User
    • What Happens to Data When a User Is Deleted in Reo.Dev?
  • FAQs/Troubleshooting
    • How to Exclude Competitors from My Segments in Reo.Dev?
    • How to Sync a Segment to Salesforce/HubSpot?
    • Why Is the 'Sync to CRM' Button Greyed Out?
    • I Synced My Accounts, But They Are Not Showing in My CRM – What to Do?
    • Why Am I Seeing More Accounts in CRM Than I Synced?
    • Why Can't I Find My Account in the Dashboard Search Bar?
    • Resolving Caching Issues in Reo.Dev
    • Understanding Score Discrepancies Between Account and Developer Activity Score
    • Reo.Dev Credit-Based Pricing: FAQs
Powered by GitBook
LogoLogo

Resources

  • Changelog
  • Playbooks
  • DevGTM Conversations
  • Support
  • API Docs

Company

  • Blog
  • Contact Us
  • Book a Demo

Policies

  • Privacy Policy
  • Terms of Service

© 2025 All rights reserved Reo.Dev

On this page
  • Create a Master Key in Apollo.ai
  • Configuring Apollo.io in Reo.Dev

Was this helpful?

  1. Integrations
  2. Email

Apollo.io

PreviousEmailNextHow to Integrate and Use Outreach.io with Reo.Dev

Last updated 12 days ago

Was this helpful?

SDRs often juggle multiple tools when prospecting—one for finding leads and another for sending emails. This fragmented workflow can slow down outreach and make it harder to engage effectively with target accounts.

However, the integration between Reo.Dev and Apollo.io changes the prospecting game by simplifying this process.

With just a few clicks, SDRs can now identify potential buyers within ICP accounts and automatically add the buying committee members into Apollo.io sequences right from Reo.Dev . This seamless integration streamlines outreach, enabling SDRs to engage the right people faster and more efficiently.

Let's see how to integrate Apollo.io with Reo.Dev.

Create a Master Key in Apollo.ai

Step 1: Log into Apollo.io Admin account

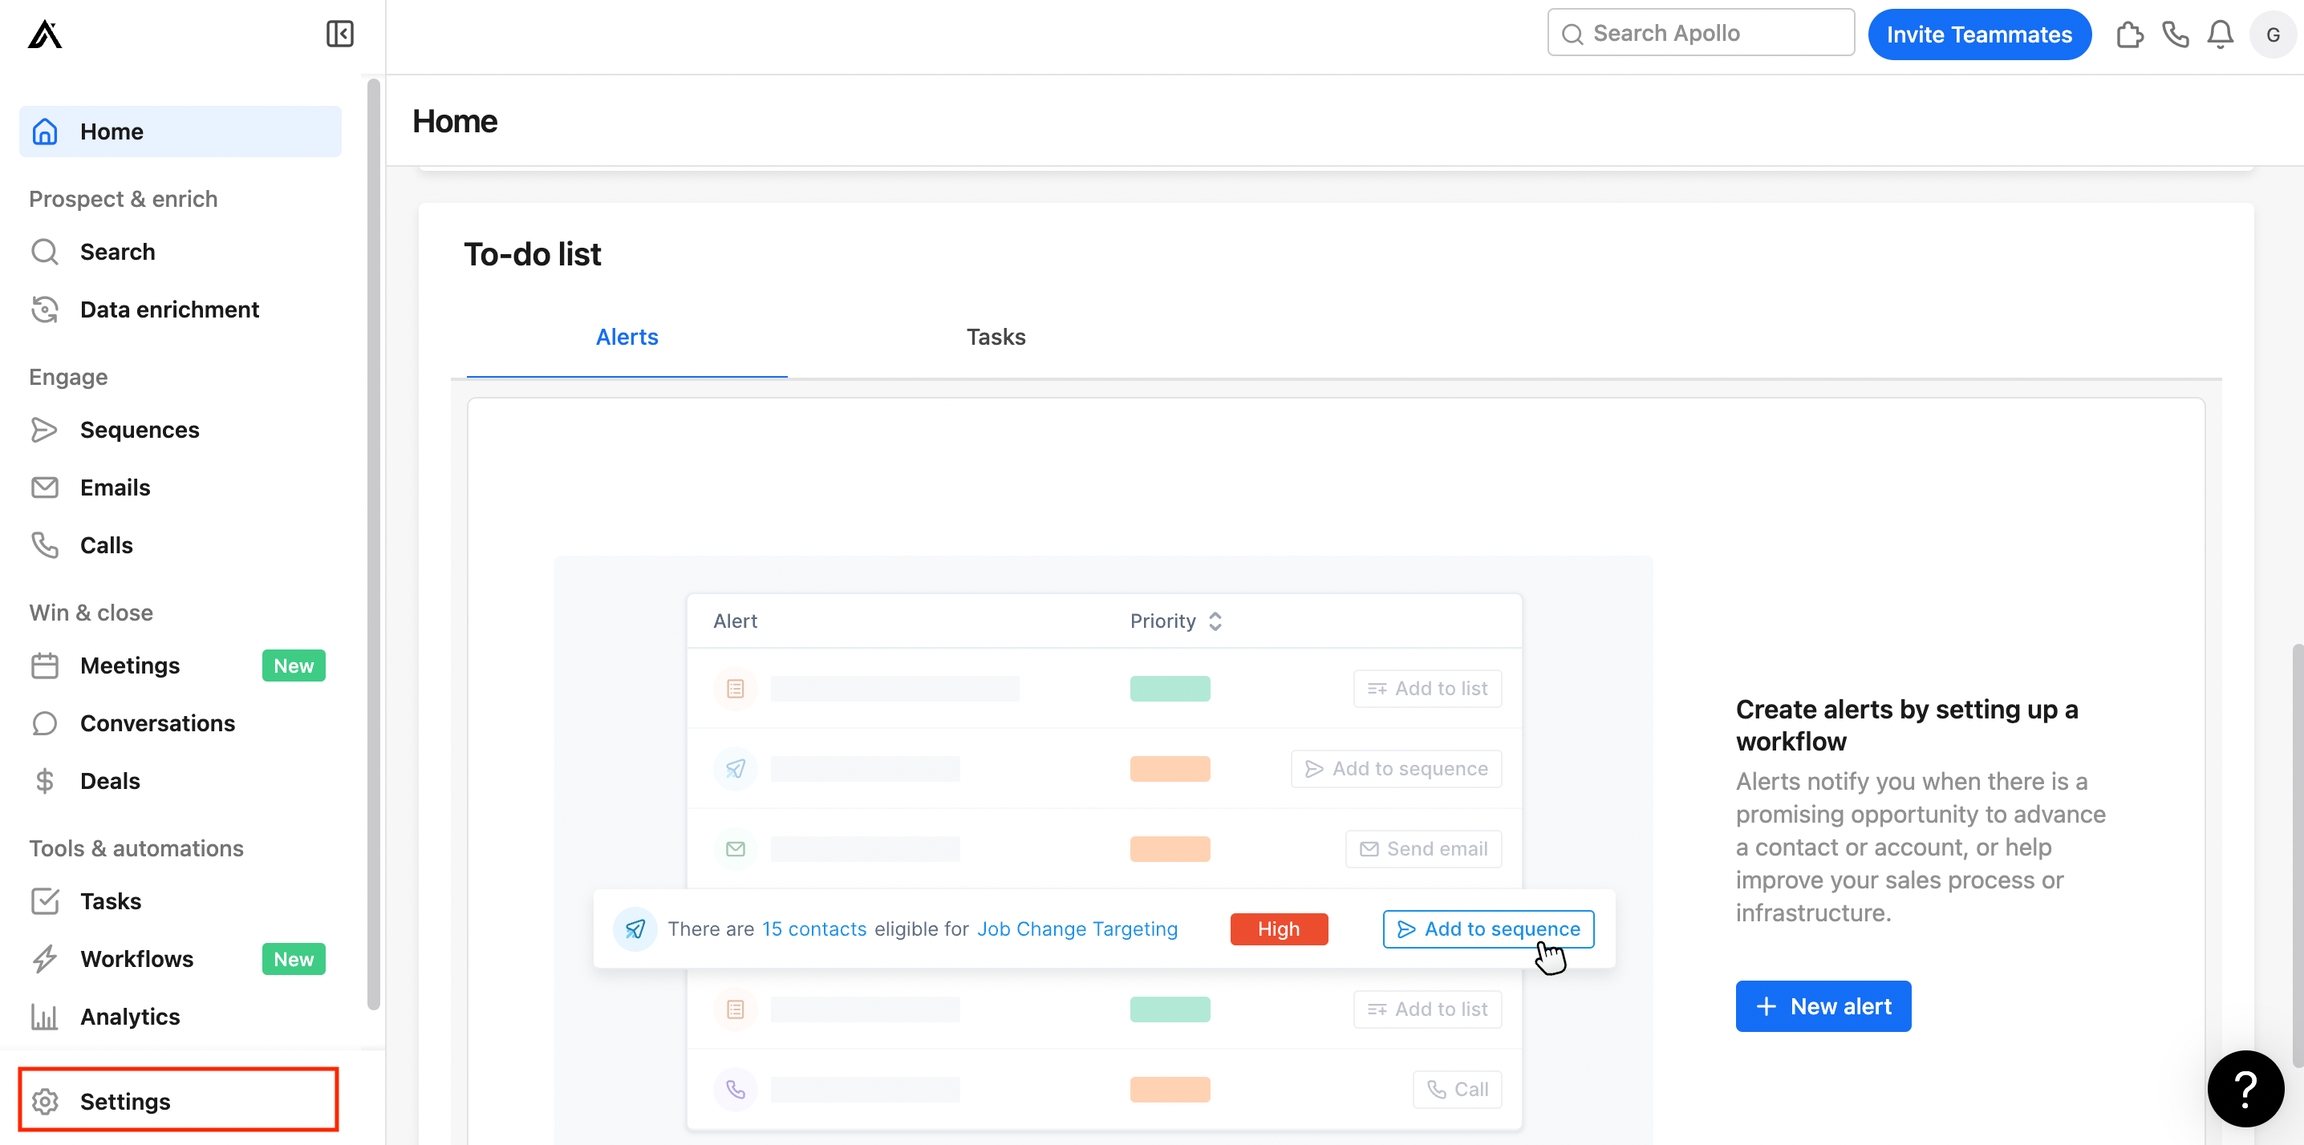
Step 2: Click on Settings.

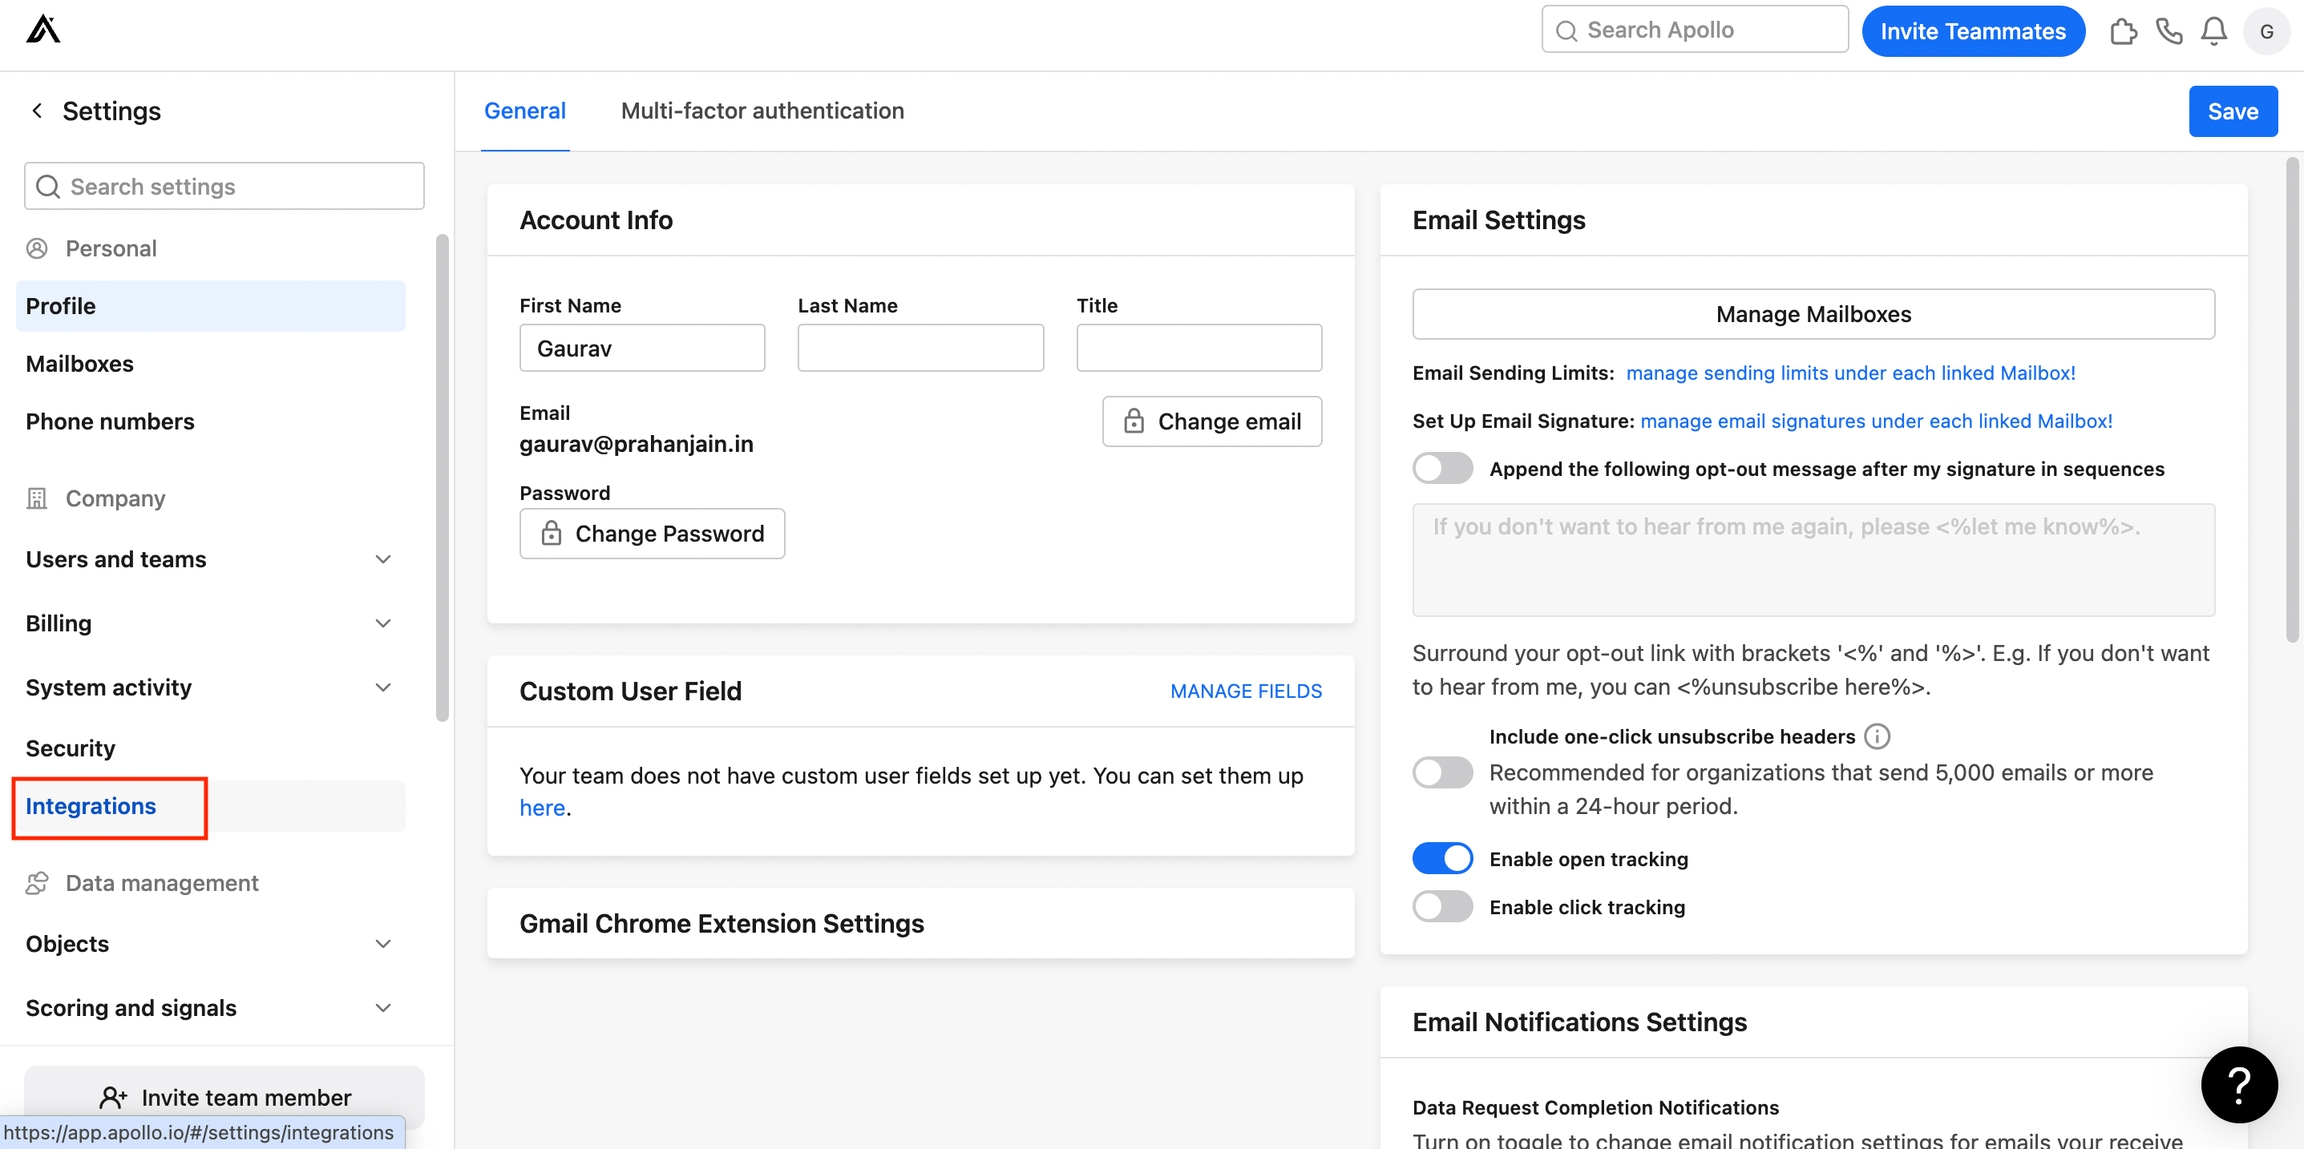
Step 3: Click on Integrations.

Step 4: Click Connect on the API block.

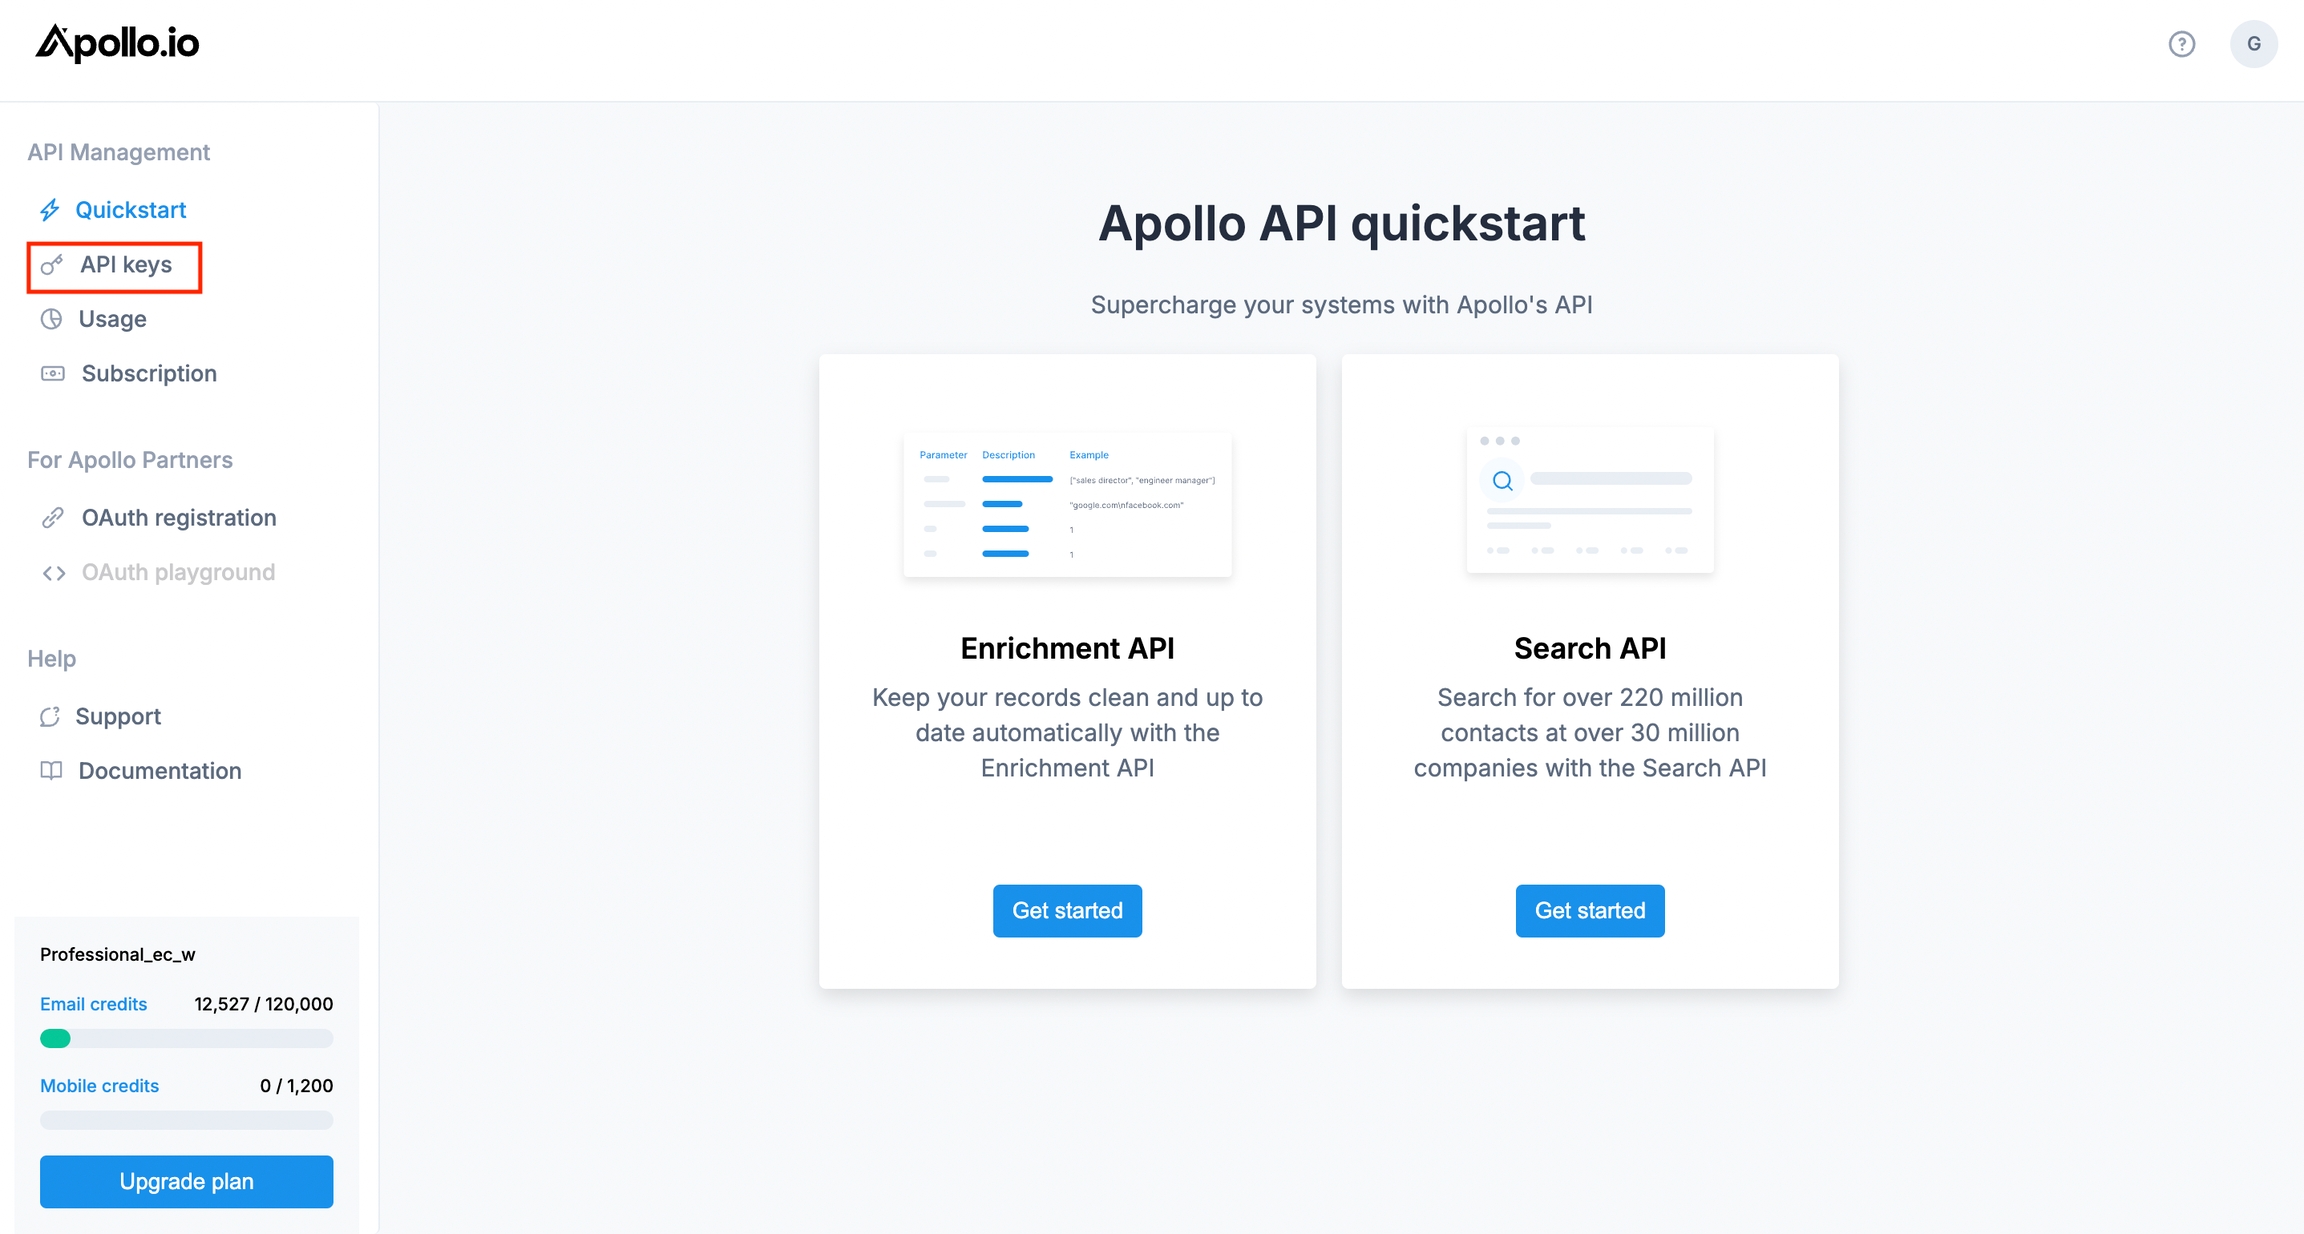
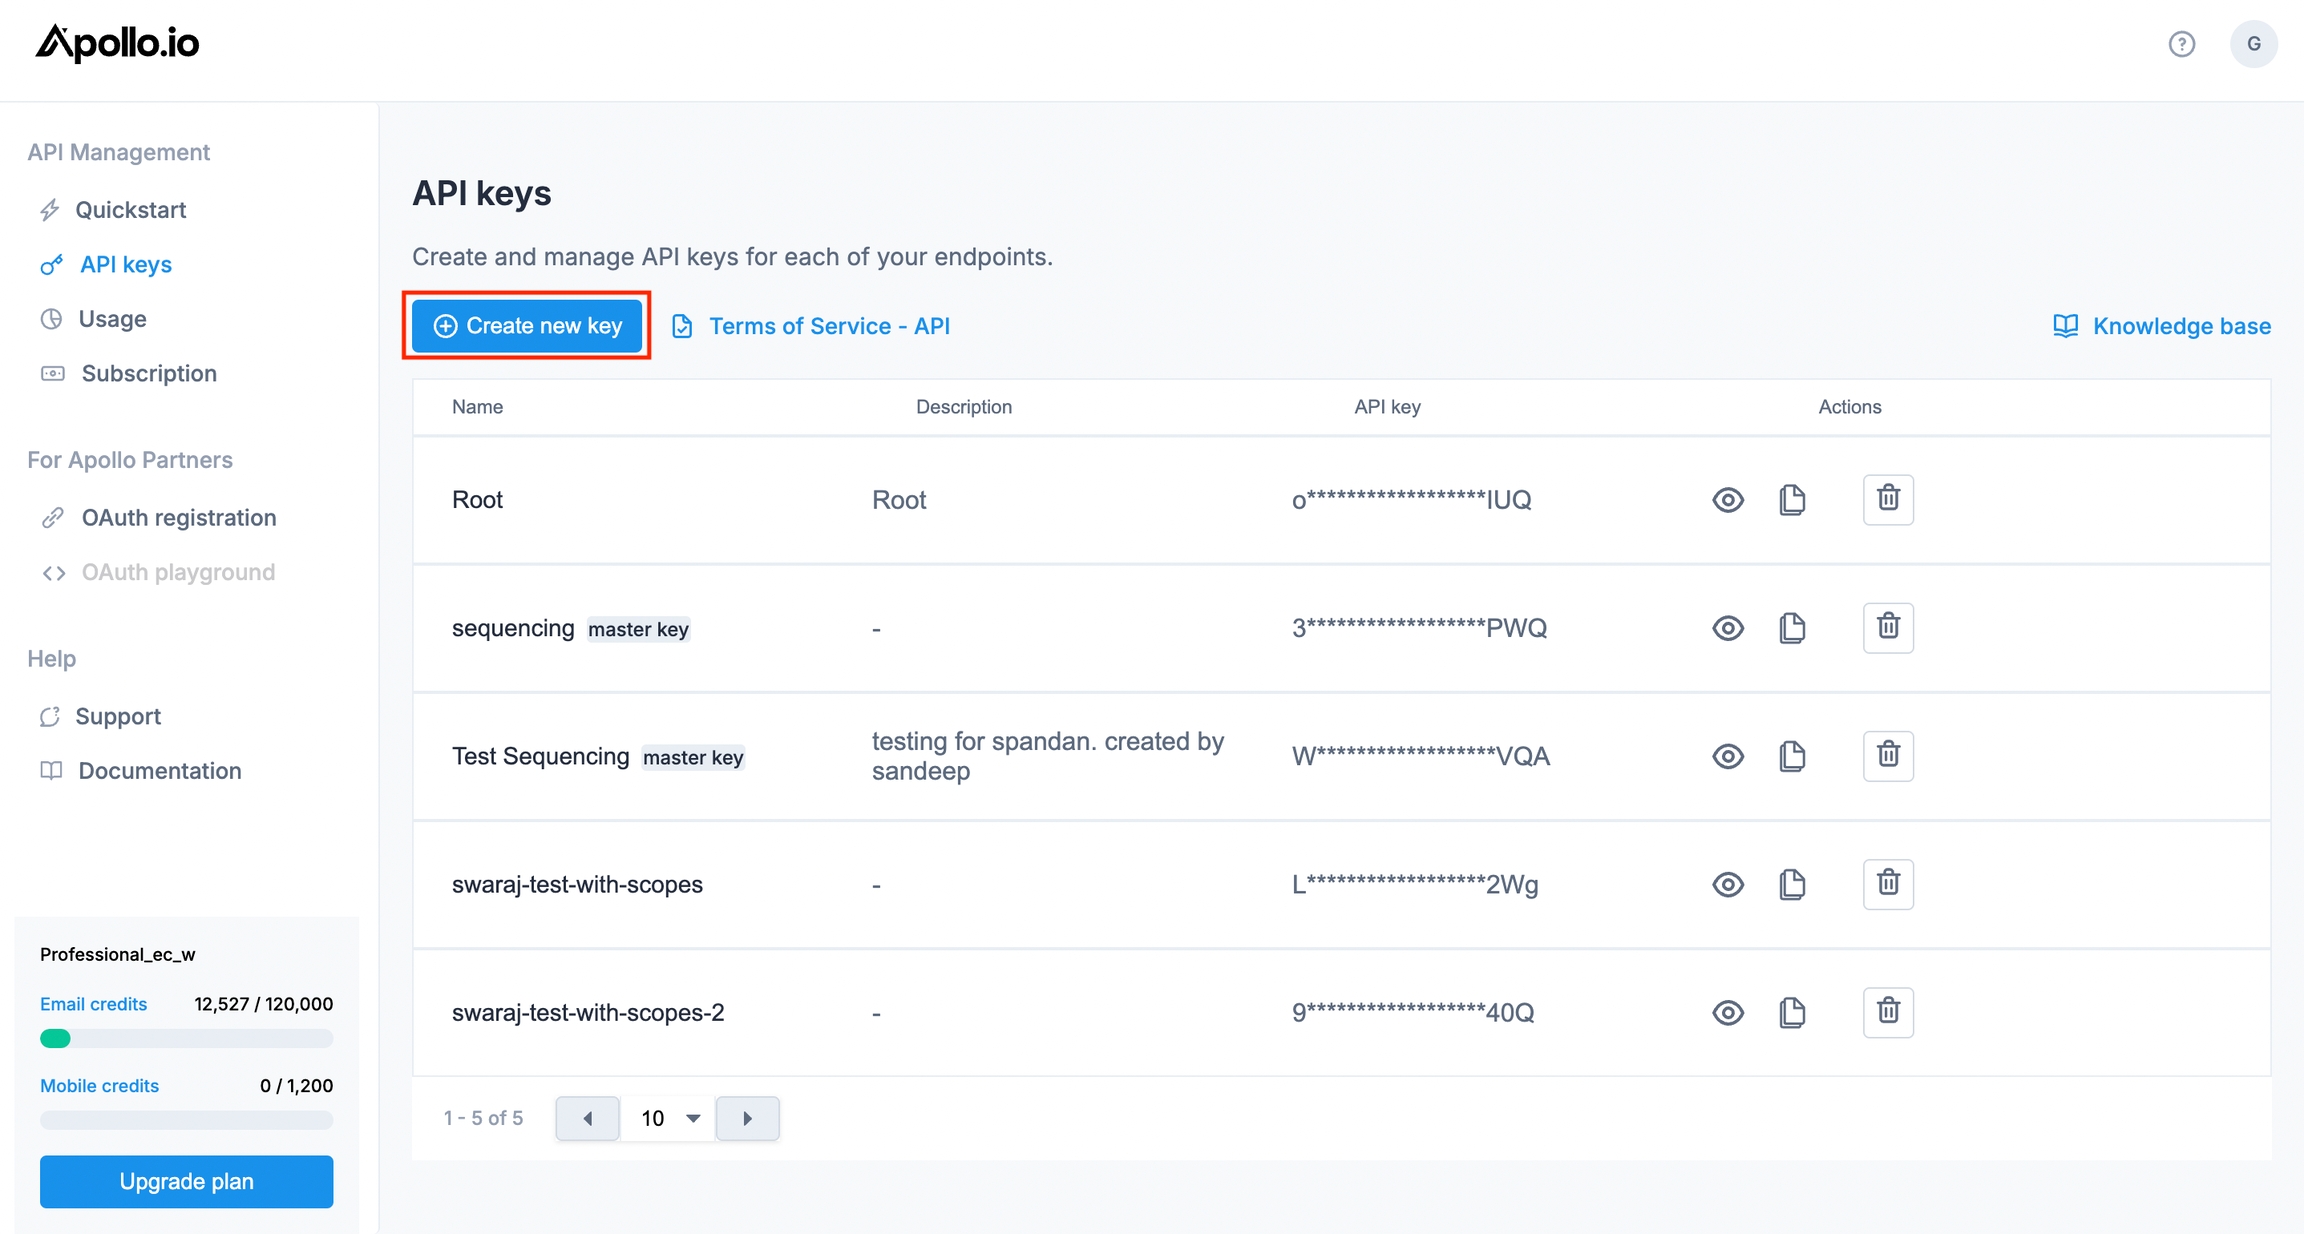
Step 5: Click API Keys on the Nav bar.

Step 6: Click on Create new key.

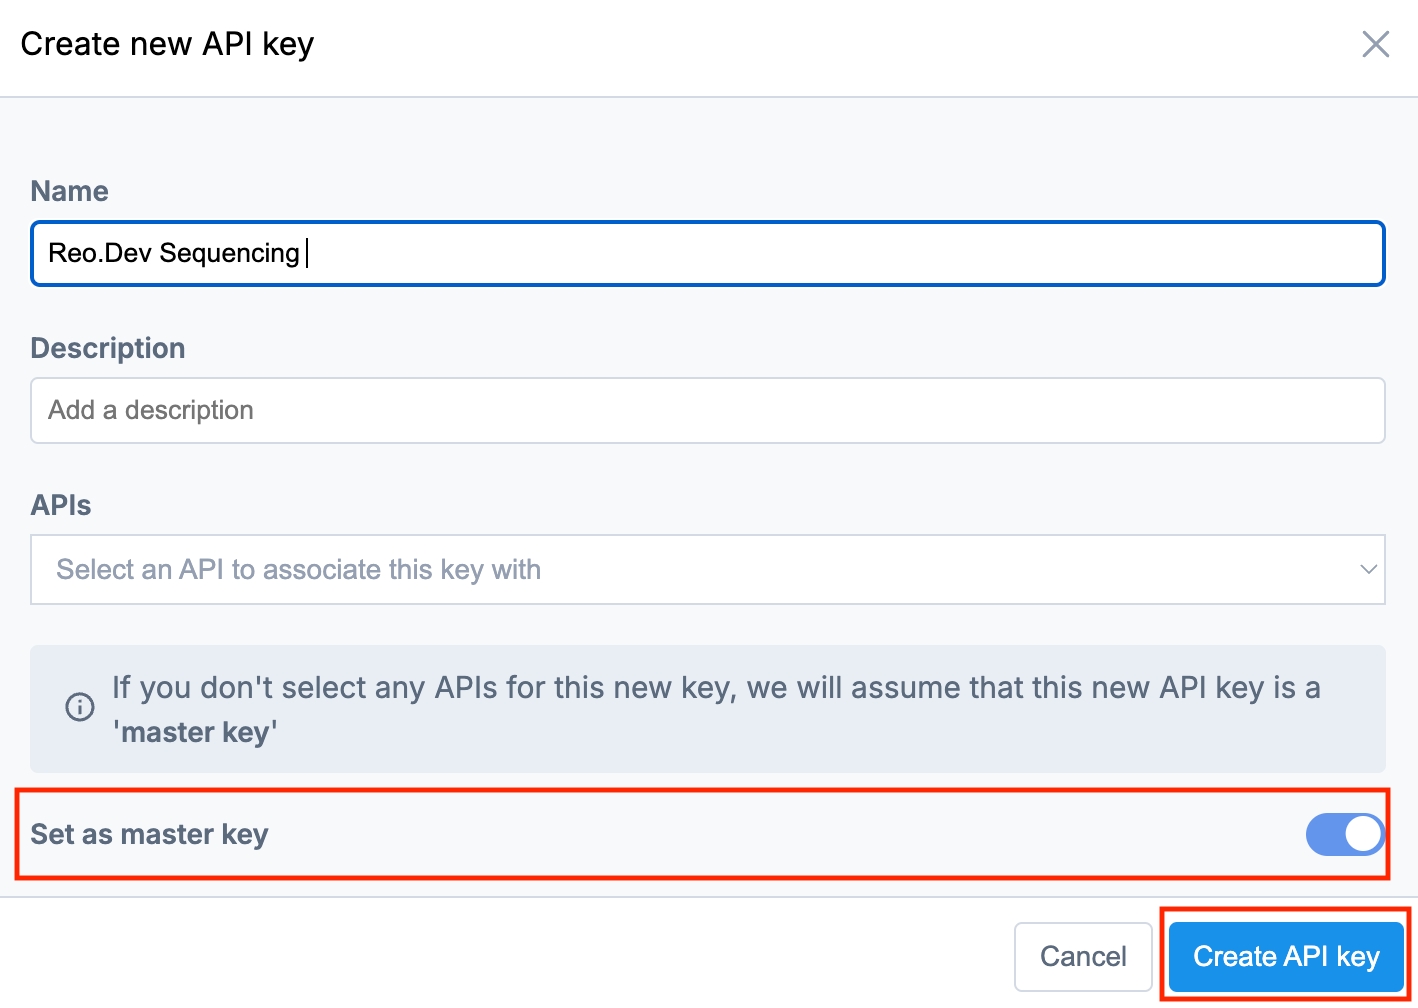
Step 7: In the popup, leave the APIs drop down blank and select the 'Set as Master key' option. Click Create API key.

Step 8: Copy this newly created API Key.

Note - Though there could be older API keys, we suggest creating a new one for Reo.Dev integration.

Configuring Apollo.io in Reo.Dev

Step 1: Login to Reo.Dev admin account.

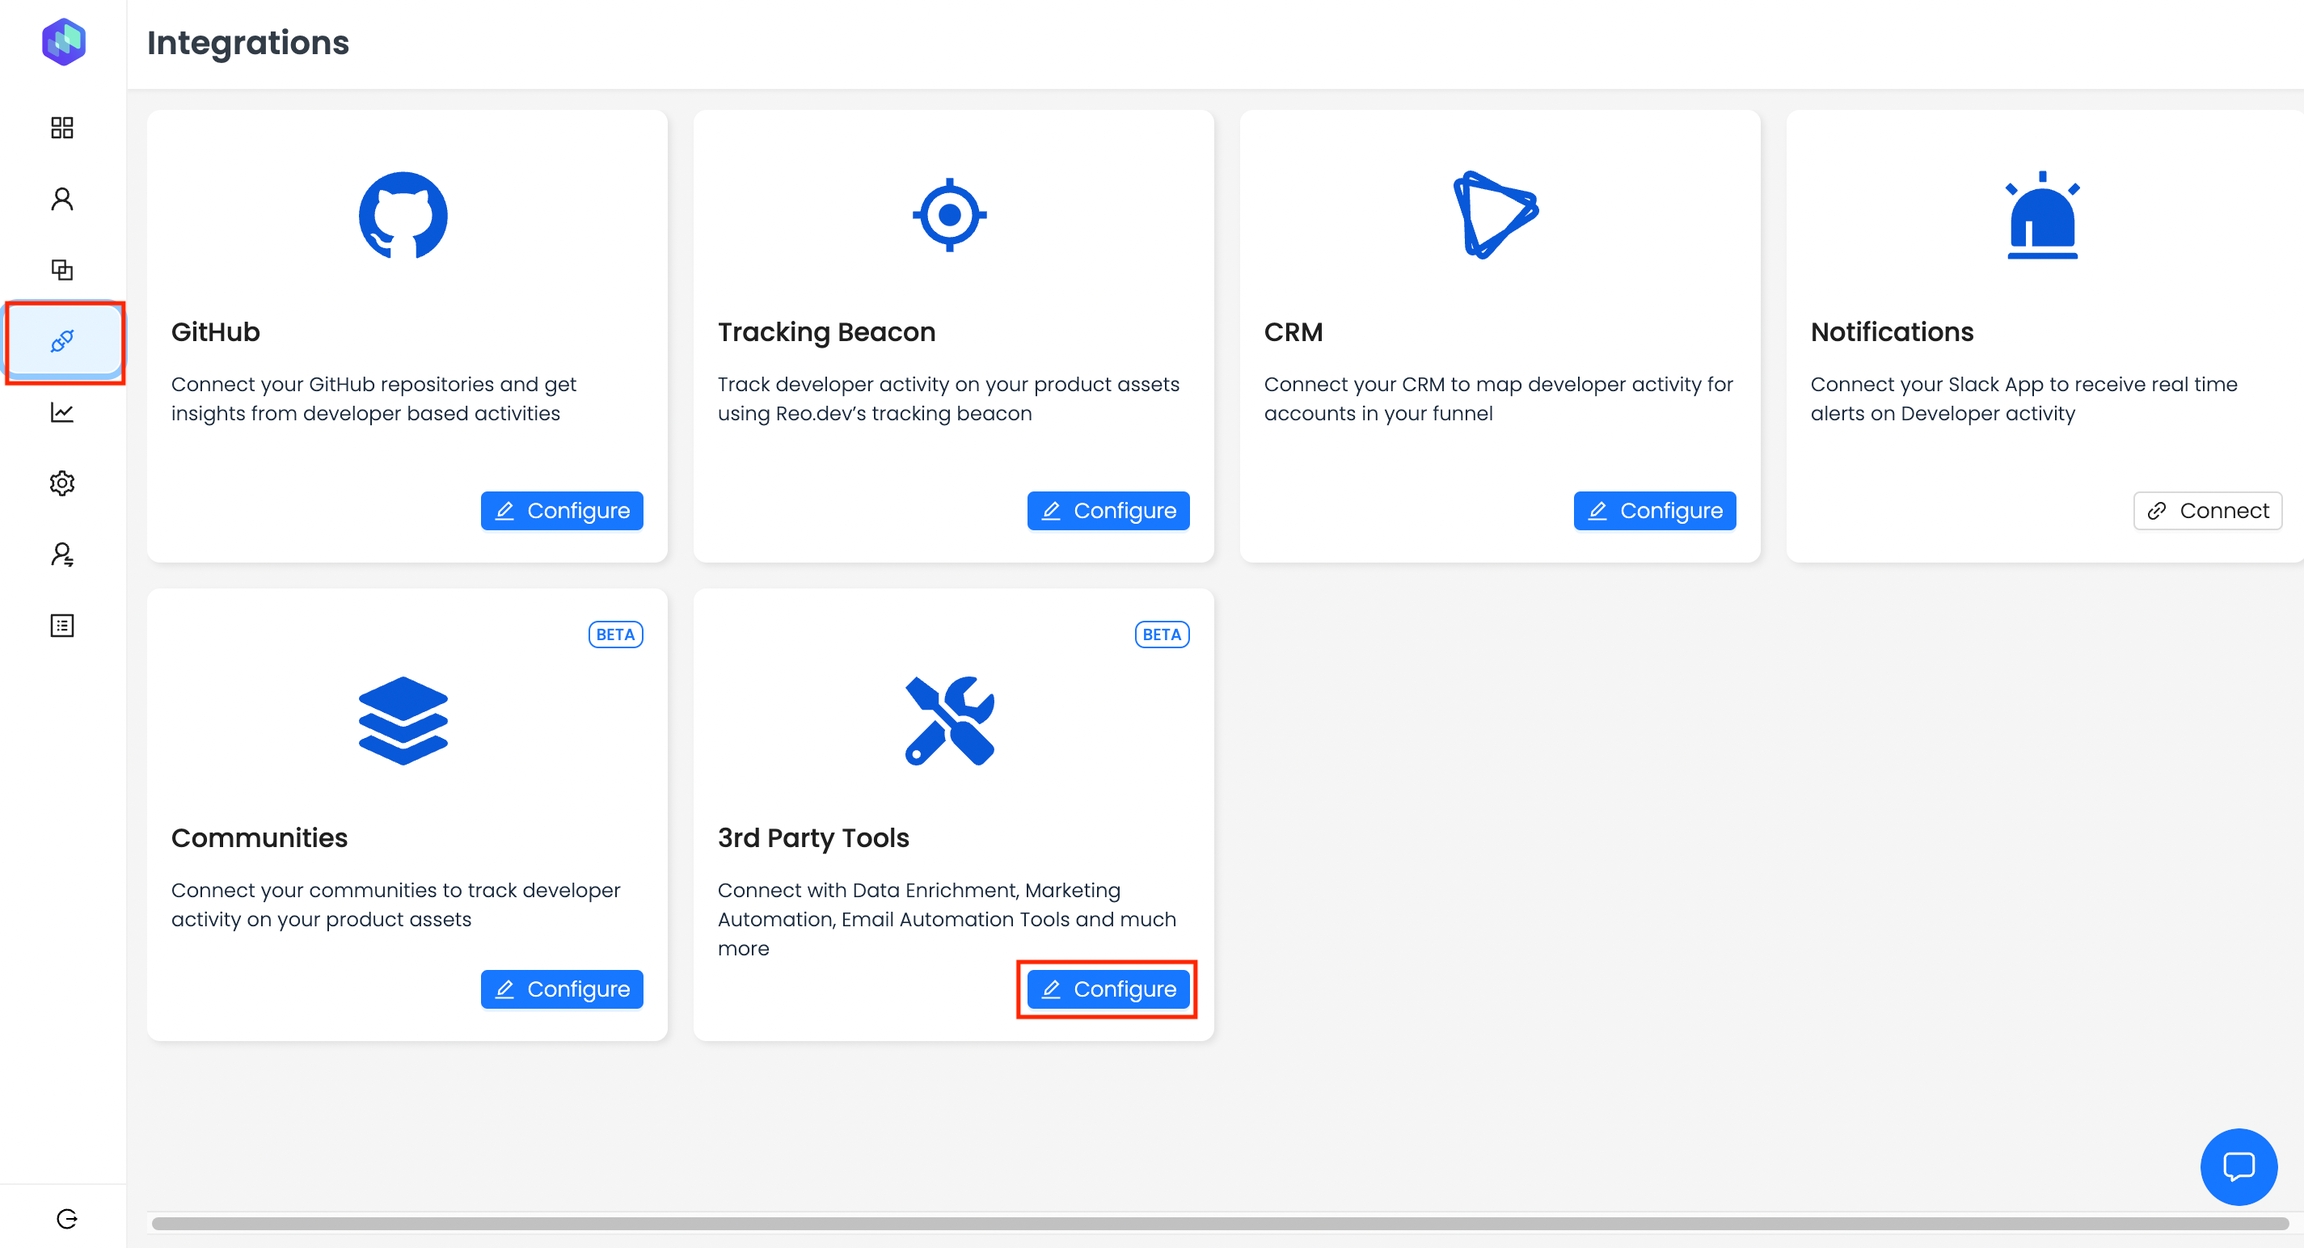
Step 2: Click on Integrations in the Nav bar and then click Configure under 3rd Party Tools.

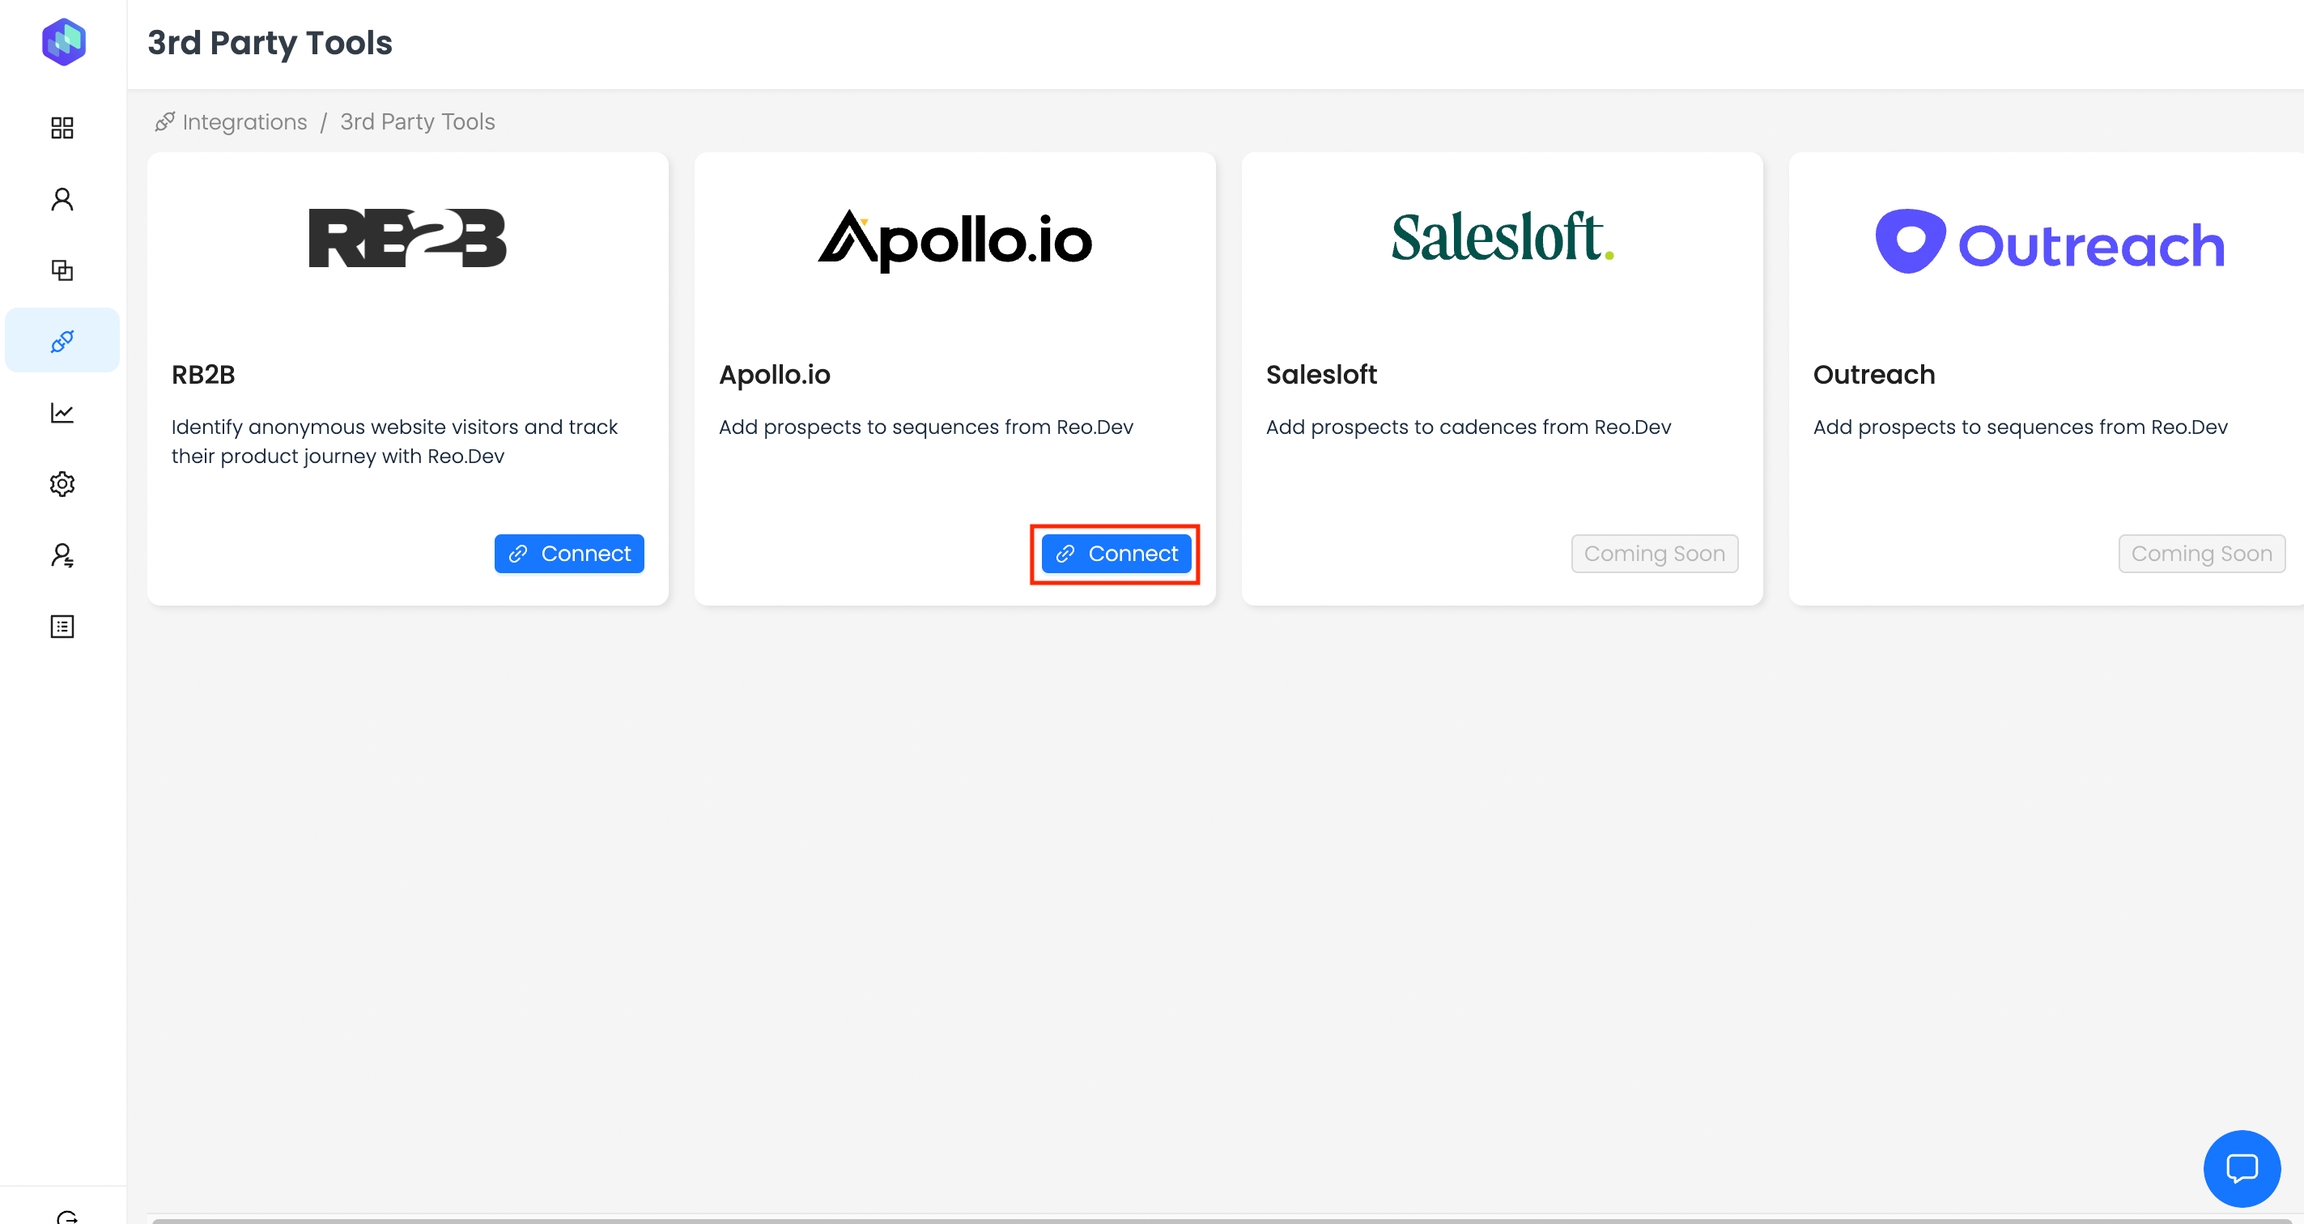
Step 3: Click Connect under the Apollo.io card.

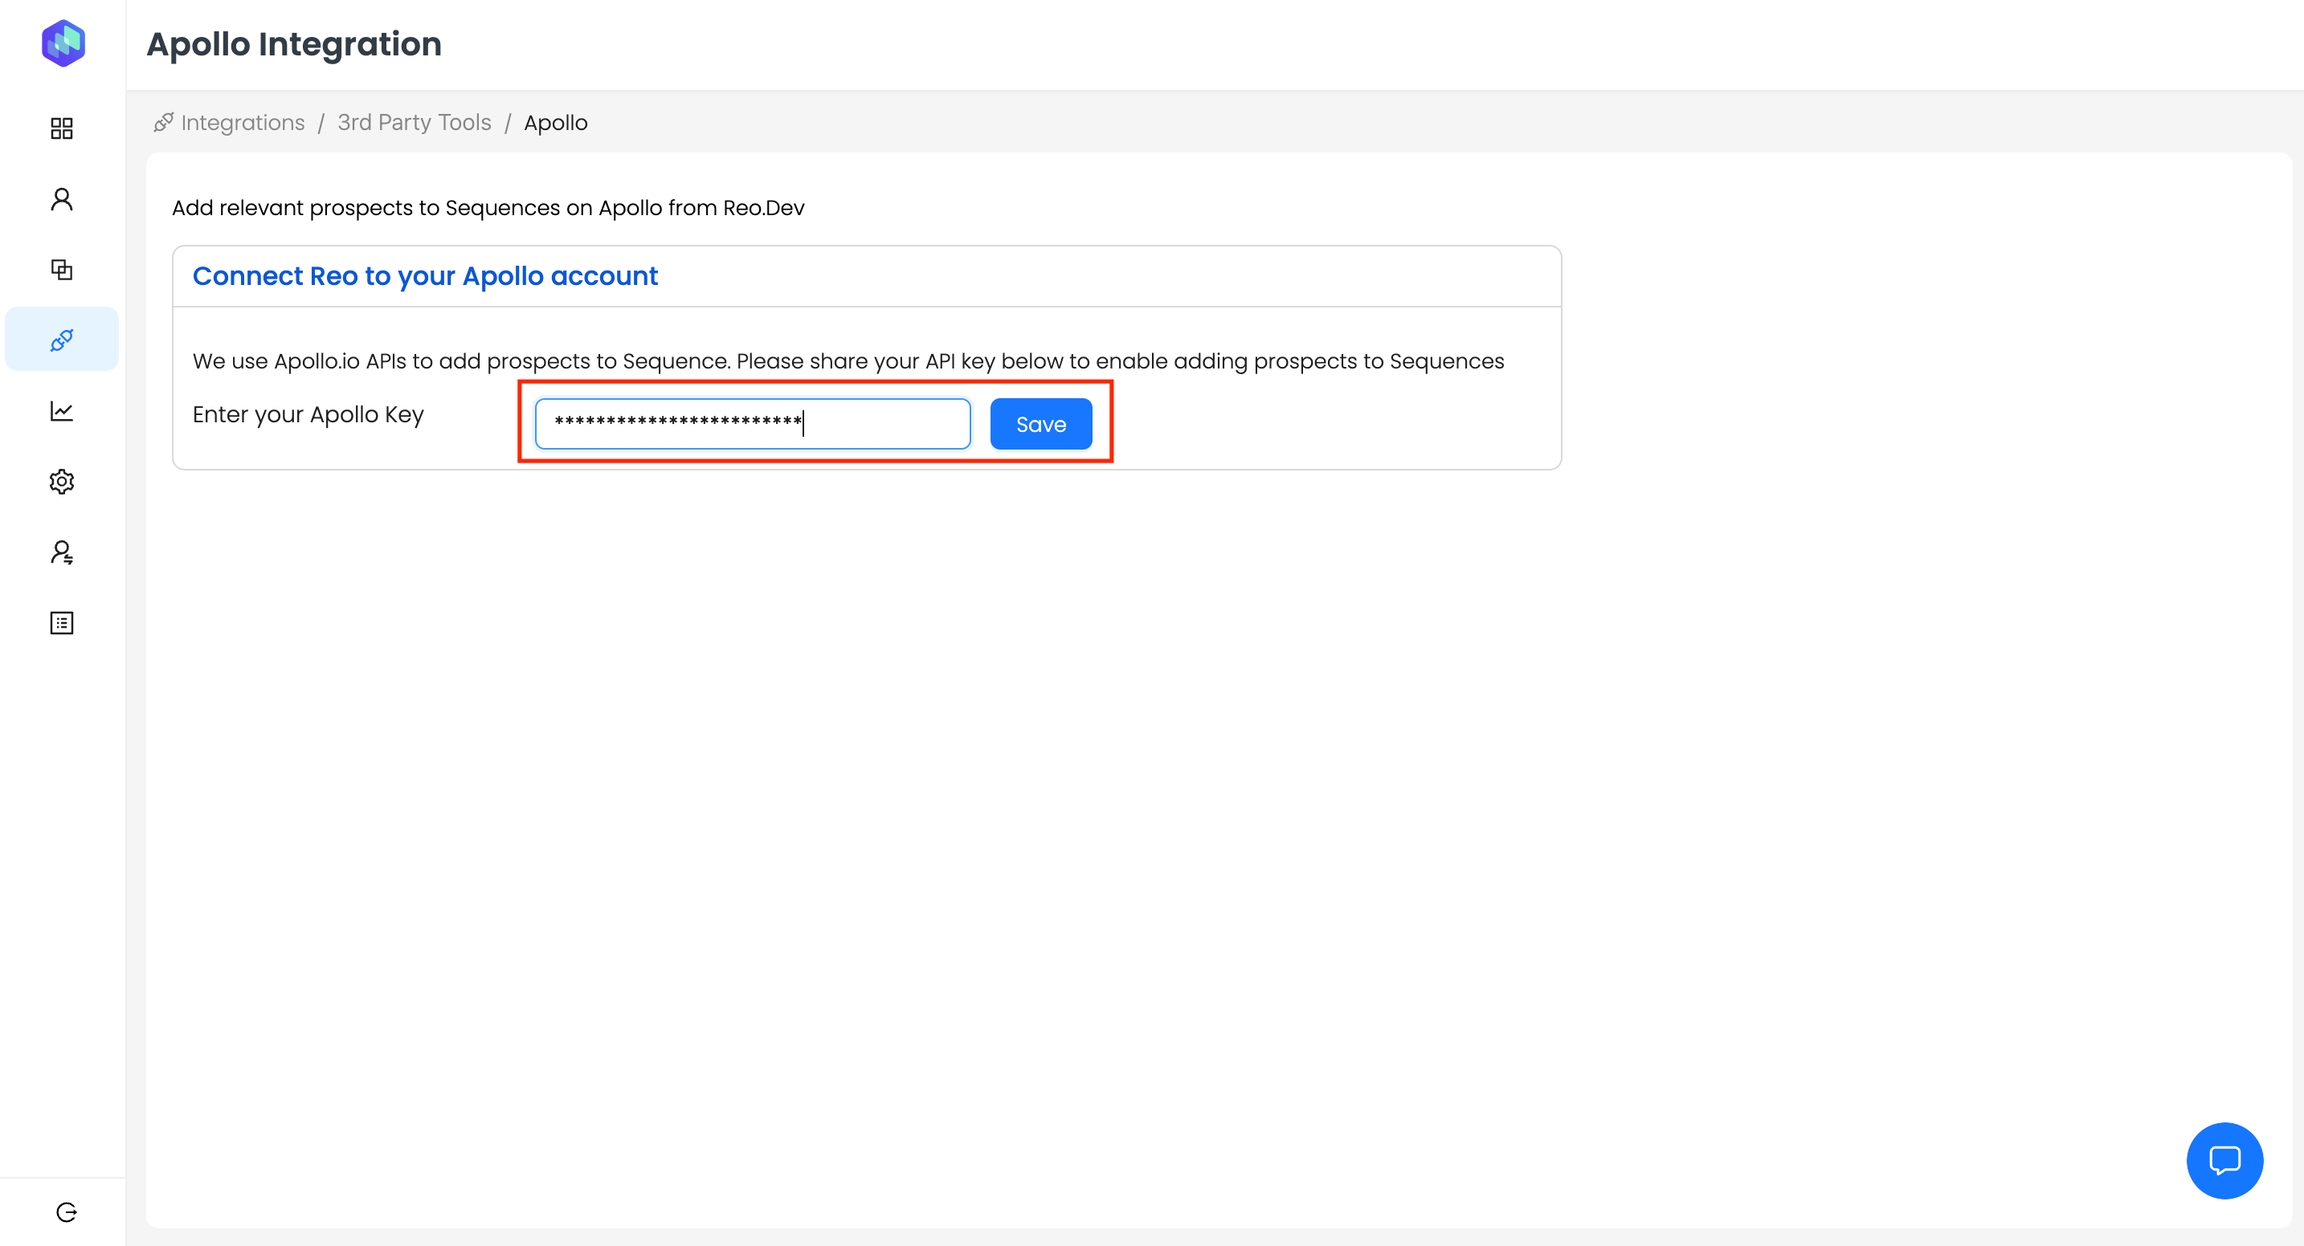
Step 4: Enter the key and click Save,

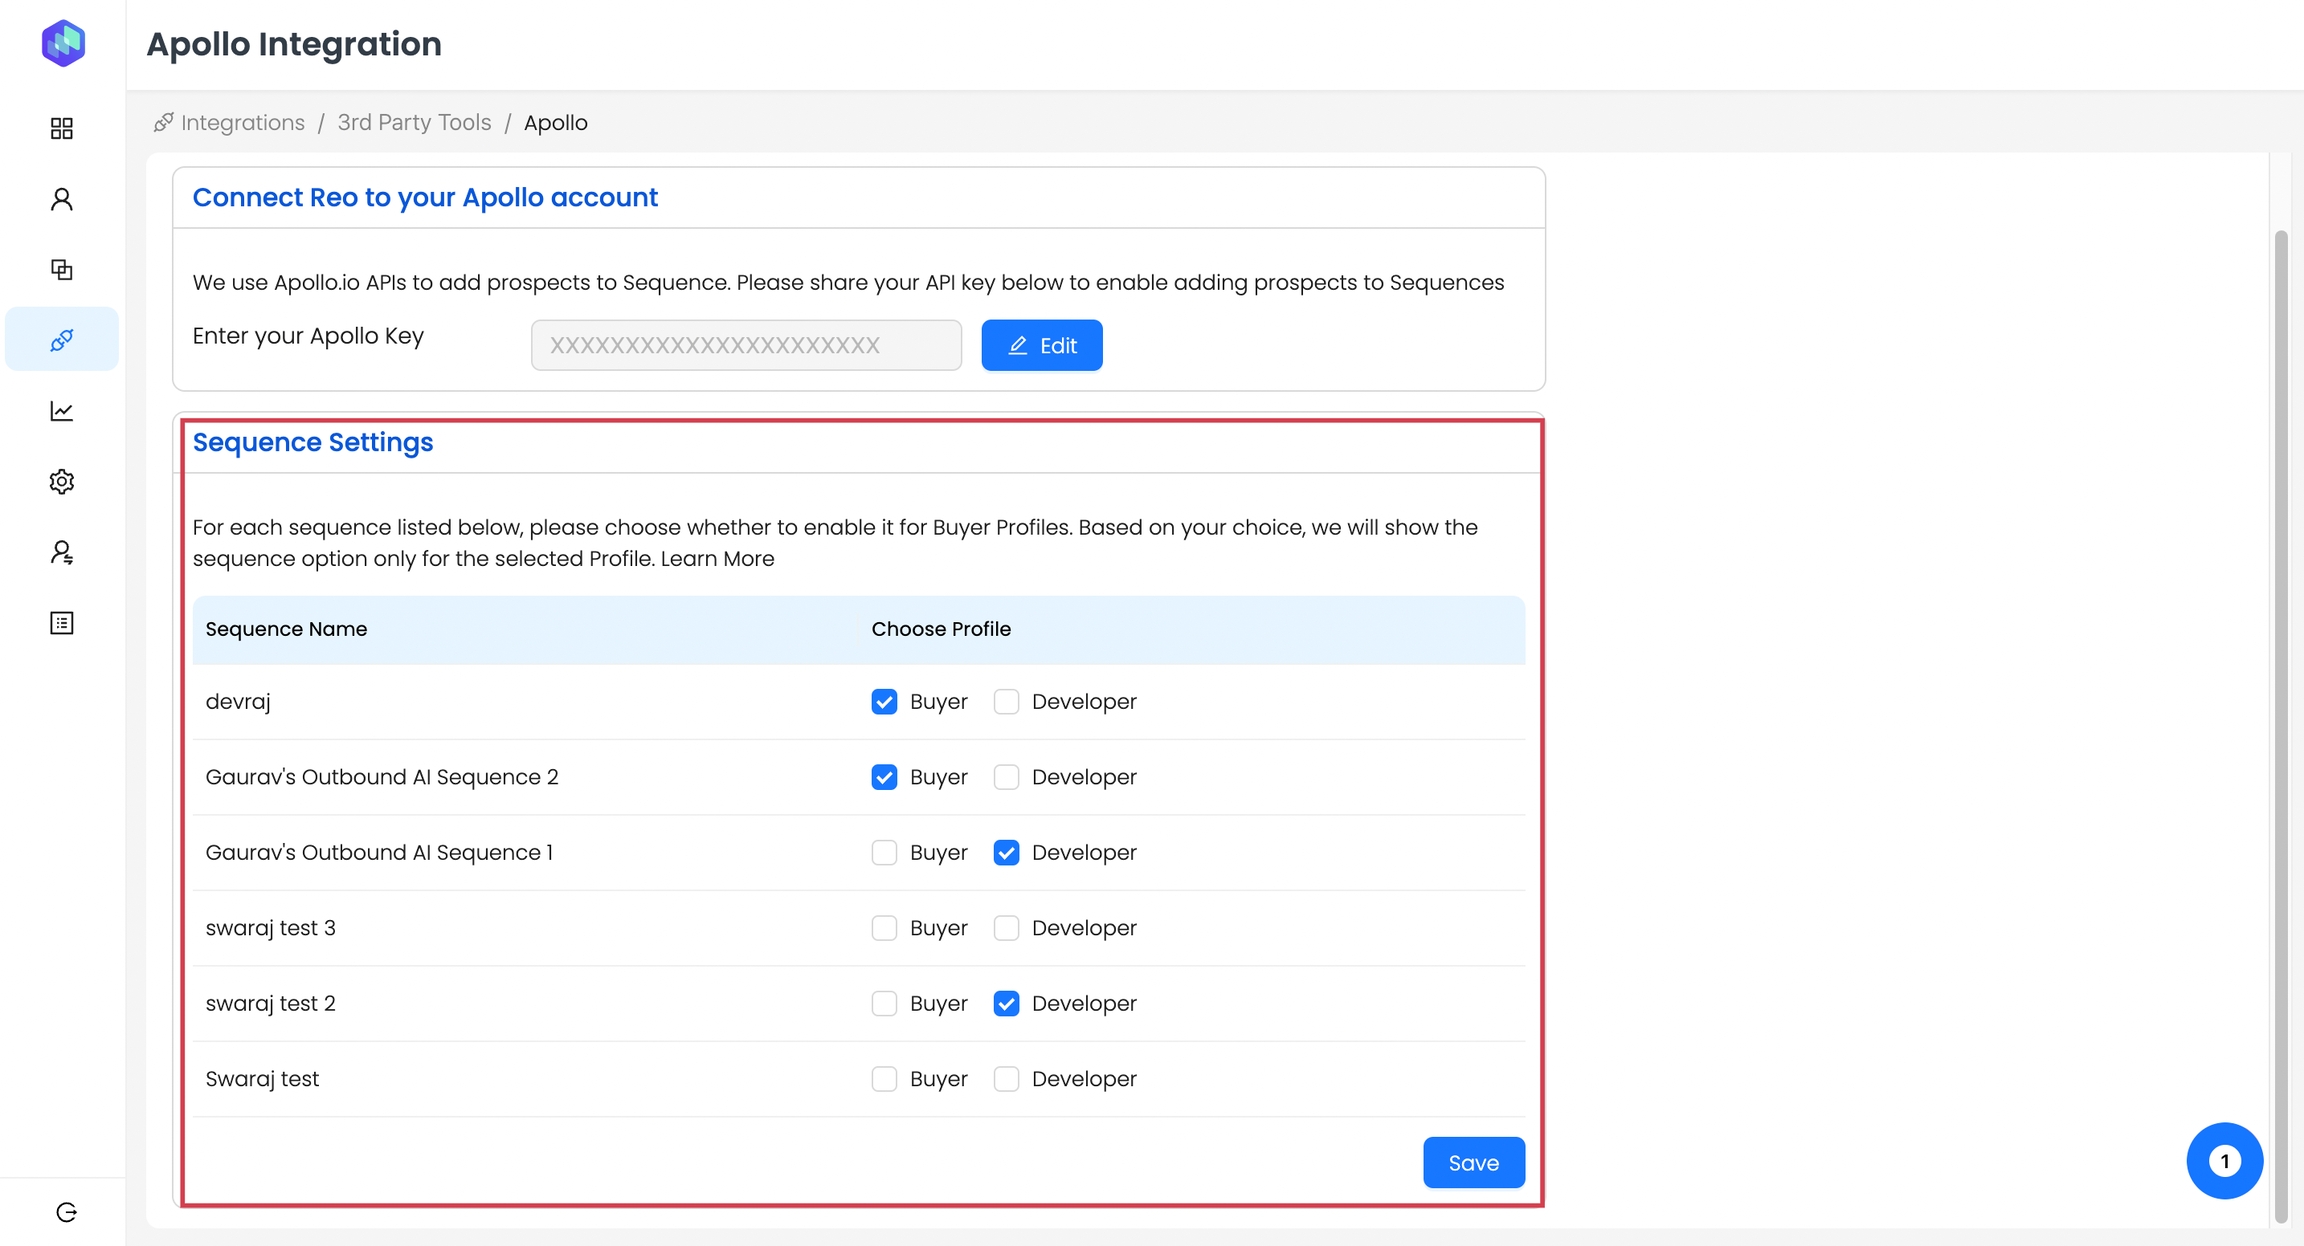
After the API key is saved, the Sequence Settings section will show up listing all he sequences present in your Apollo.io account.

You can choose to enable a specific sequence for either the Buyer profile or the Developer profile. The Buyer profile represents decision-makers, while the Developer profile consists of individuals engaging with your product’s assets who may not necessarily be buyers.

Based on your selection, the sequence option will be displayed exclusively for the chosen profile.


🔗 Additional Testing Guide for Reo.Dev

To ensure your email integration is working end-to-end, including how Reo.Dev syncs data with Apollo.io and how emails are triggered, refer to our detailed testing guide:

Quick Note: To access Apollo sequences in Reo.Dev, ensure they're shared with your team or Reo.Dev members.

Here's a quick guide on sharing sequences on Apollo.
Testing Your Email Integration with Reo.Dev