LogoLogo
API DocsChangelogPlaybooksLoginBook a Demo
  • Getting Started
    • Introduction to Reo.Dev
    • For Users
      • Step 1: Find active accounts to target
      • Step 2: Track developer activity on your target accounts
      • Step 3: Identify developers engaging with your product
      • Step 4: Build custom segments that are most likely to convert
      • Step 5: Use filters to spot high-intent leads
    • For Admins
      • Step 1: Identify active accounts to target
      • Step 2: Track developer activity on your target accounts
      • Step 3: Find developers engaging with your product
      • Step 4: Create custom segments that are most likely to convert
      • Step 5: Integrating data sources with Reo.Dev
      • Step 6: Integrate Slack and set up notifications
      • Step 7: Add Customer Fit Criteria
  • Accounts
    • Account Lifecycle Stage
    • Custom CRM Stages
    • Developer Funnel Stages
    • Account Activity Score
    • Tags
    • Customizing Tags
    • Custom Lists
    • Using the Lists API in Reo.Dev
    • Managing CRM Owners in Reo.Dev
    • Follow an Account
    • How to Set Up Notification Alerts for Accounts, Developers & Segments in Reo.Dev
    • Flag incorrect data
  • Developers
    • Interpreting Intel on the Developer view page
    • Developer Activity Score
    • How to Find Inbound Developers in Reo.Dev
  • Segments
    • Creating Segments
    • Basic & Advance Segments
    • Filters 101
    • Segment Actions
    • My Segments
    • Shared Segments
    • Magic Segments
    • Favourite Segment
    • Add notes for better collaboration and context
    • CSV Exports for Segments
    • 10 Advanced Segments to create to spot high-intent opportunities
  • Buyers
    • Find Buyer Contact
    • How to Find, Segment & Engage Decision-Makers in Reo.Dev’s Buyer Section
    • Buyer Persona Configuration in Reo.Dev
  • Enrichment
    • Enrichment
  • Audiences
    • Buyer Audience
  • Integrations
    • Connect GitHub repositories
    • Reo.Dev Zapier Integration Guide
    • Webhooks
    • Developer Docs
      • Docusaurus
      • GitBook
    • CRM
      • HubSpot
      • Salesforce
      • Pipedrive
      • Zoho
      • Freshworks
      • Leadsquared
    • Tracking Beacon
      • Install JavaScript for Documentation
      • Install JavaScript for Product
      • Install JavaScript in Website
      • Install JavaScript in Local Product
      • Track Code Interactions
      • Install JavaScript for Documentation through Google Tag Manager
      • Reo.Dev JavaScript Cookies and Consent Guide
    • Product Usage API
      • Overview
      • How to Configure Product Usage Metrics in Settings
      • Telemetry Data
      • Product API
      • Examples of Product Usage Metrics
      • Data Collected for Product Usage
    • Communities
      • Open Communities
      • Owned Communities
        • Slack
        • LinkedIn Company Page
    • Email
      • Apollo.io
      • How to Integrate and Use Outreach.io with Reo.Dev
      • How to Integrate and Use Salesloft with Reo.Dev
    • Website Tracking
      • RB2B
  • Analytics
    • Impact Dashboard
  • Campaigns
    • Run bulk email campaigns
    • Testing Your Email Integration with Reo.Dev
  • Settings
    • Add Customer Fit Score Criteria
    • Add Firmographic and Technographic Filters
    • Configure Slack & Email Notifications
  • Account and Contact Usage Limit
    • Manage Account and Contact Limit Usage
  • User Management
    • Invite a teammate to Reo.Dev
    • Manage CRM Permissions
    • Roles and Permissions: Admin vs User
    • What Happens to Data When a User Is Deleted in Reo.Dev?
  • FAQs/Troubleshooting
    • How to Exclude Competitors from My Segments in Reo.Dev?
    • How to Sync a Segment to Salesforce/HubSpot?
    • Why Is the 'Sync to CRM' Button Greyed Out?
    • I Synced My Accounts, But They Are Not Showing in My CRM – What to Do?
    • Why Am I Seeing More Accounts in CRM Than I Synced?
    • Why Can't I Find My Account in the Dashboard Search Bar?
    • Resolving Caching Issues in Reo.Dev
    • Understanding Score Discrepancies Between Account and Developer Activity Score
    • Reo.Dev Credit-Based Pricing: FAQs
Powered by GitBook
LogoLogo

Resources

  • Changelog
  • Playbooks
  • DevGTM Conversations
  • Support
  • API Docs

Company

  • Blog
  • Contact Us
  • Book a Demo

Policies

  • Privacy Policy
  • Terms of Service

© 2025 All rights reserved Reo.Dev

On this page

Was this helpful?

  1. FAQs/Troubleshooting

How to Exclude Competitors from My Segments in Reo.Dev?

PreviousFAQs/TroubleshootingNextHow to Sync a Segment to Salesforce/HubSpot?

Last updated 12 days ago

Was this helpful?

When creating account segments in Reo.Dev, you may want to exclude competitor accounts from your targeting. This can be easily done by uploading a competitor account list and applying it as a filter when building segments.


Step 1: Upload Your Competitor Account List

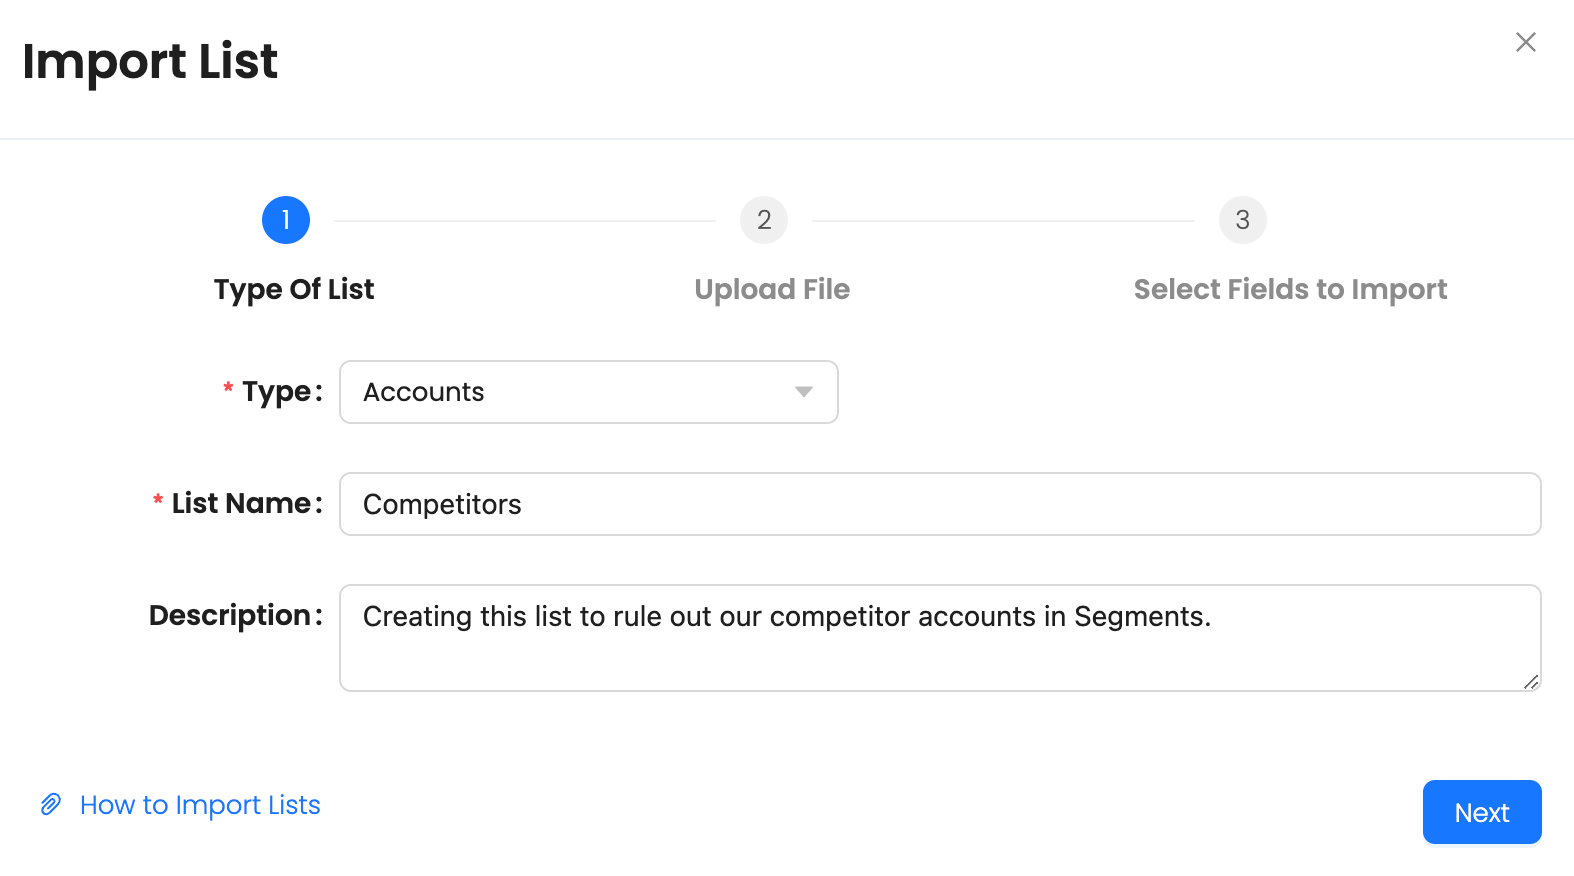
Before excluding competitors in segments, you need to upload a list of competitor domains to My Lists in Reo.Dev.

Use this sample CSV format when creating and uploading your competitor domain list. Ensure that the "Company Domain Name" column includes all competitor domains you want to exclude from your account segments.

How to Upload the List:

  1. Navigate to My Lists in Reo.Dev.

  2. Click Import List → Select Accounts as the list type.

  3. Name the list (e.g., "Competitors").

  4. Upload a file containing competitor account domains (CSV file type).

  5. Map the Account Domain field and complete the upload.

Click Done to save the list.


Step 2: Exclude Competitor Accounts from a Segment

Once your competitor list is uploaded, follow these steps to exclude these accounts when creating a segment:

How to Apply the Filter:

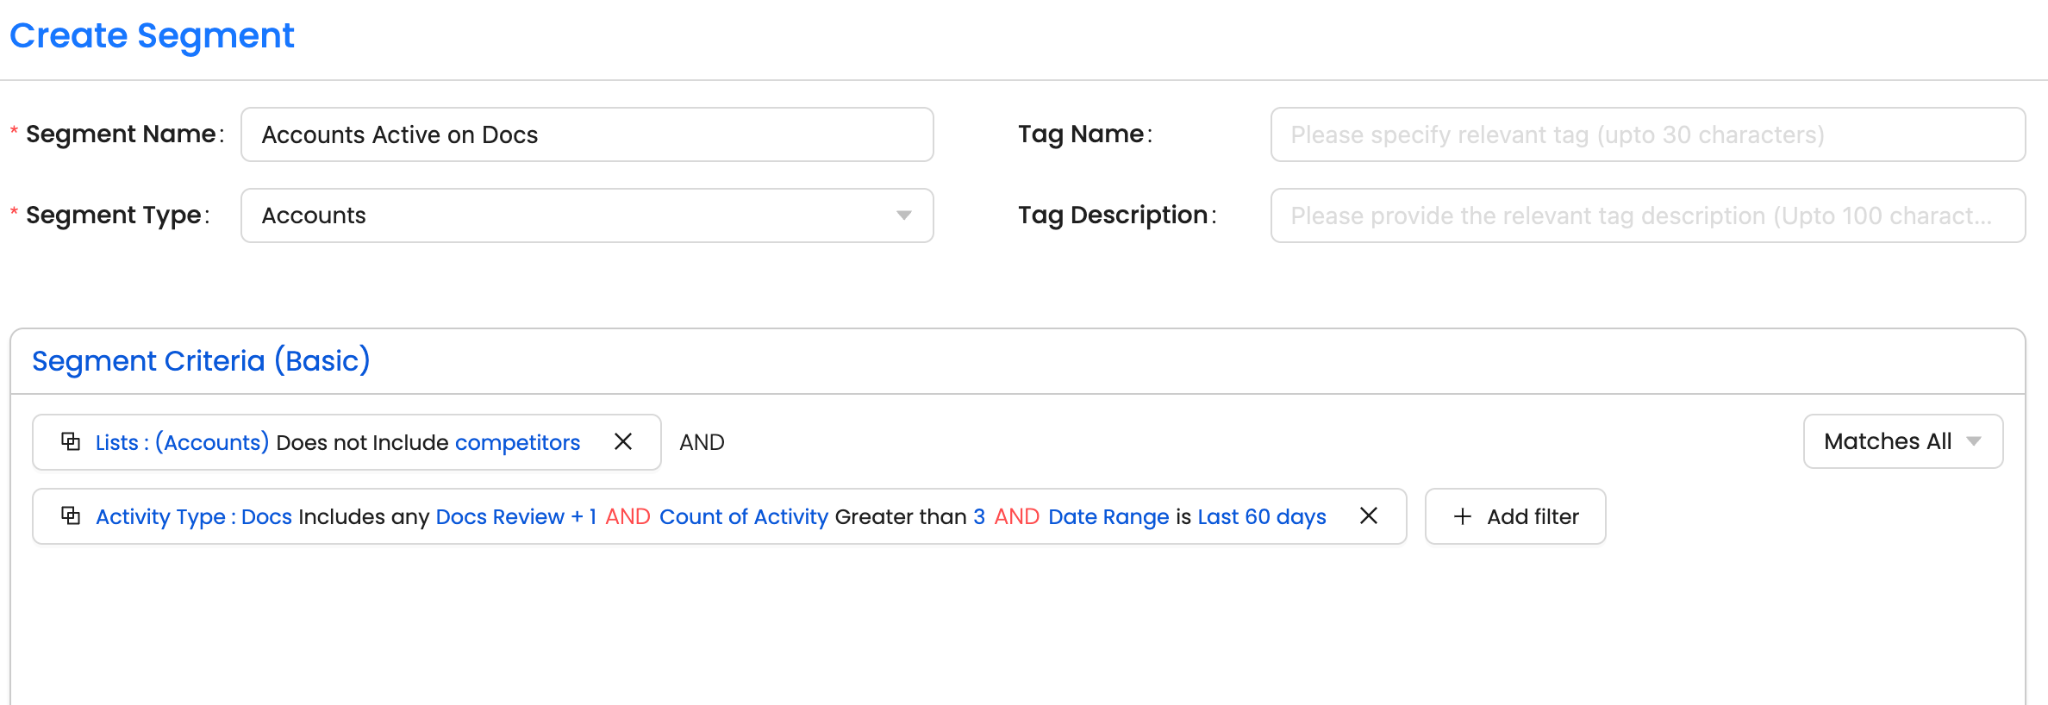
  1. Go to Create Segment in Reo.Dev.

  2. Choose Segment Type → Accounts.

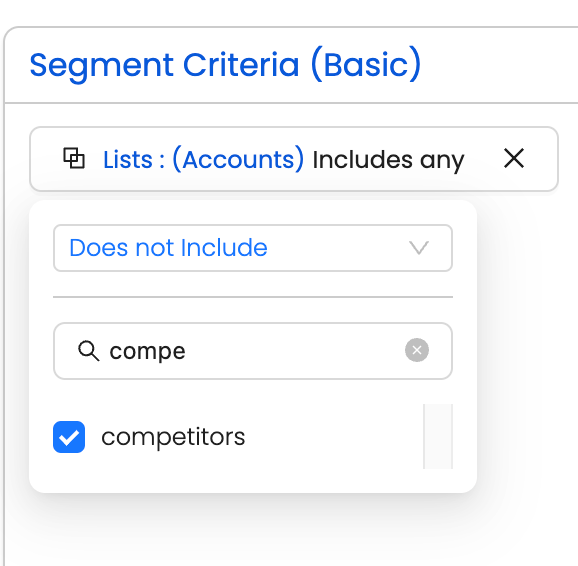
  3. Under Segment Criteria (Basic):

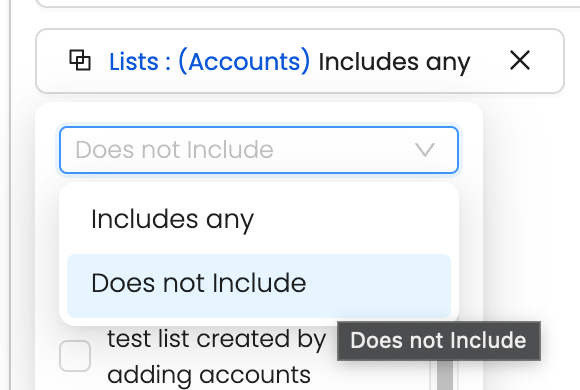
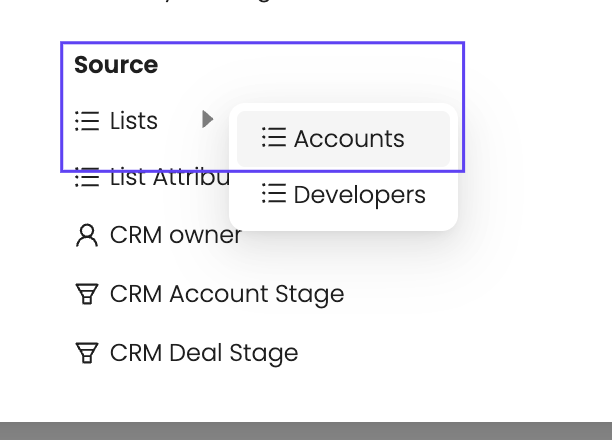
    • Under Source → Click on Lists → Select Accounts.

    • Select Does not Include from the dropdown.

    • Check the box for your uploaded Competitor List name from the dropdown.

  4. Add any additional filters as needed.

  5. Click Save Segment.

Tip: When building account segments, you can choose to always exclude competitor accounts to focus only on high-intent prospects.


By following these steps, you can create cleaner, more targeted account segments in Reo.Dev while avoiding engagement with competitors.

Reference Guide:

How to Upload a List in Reo.Dev