> For the complete documentation index, see [llms.txt](https://docs.reo.dev/llms.txt). Markdown versions of documentation pages are available by appending `.md` to page URLs; this page is available as [Markdown](https://docs.reo.dev/configurations/product-usage.md).
# Product Usage
Reo.Dev provides flexibility to define and track custom product usage metrics using the Product API. This capability allows teams to set up highly relevant metrics that align with their business goals and developer engagement tracking. Here’s a step-by-step guide on configuring custom parameters and mapping intent levels in the Reo.Dev dashboard:
***
### **Setting Up Custom Metrics**
1. Navigate to Configurations, select 'Configure' under the **Product Usage** card.
2. Add your **Metrics** (e.g., `USER_PORTAL_SIGN-UP`) and provide the **Mode** (`Single/Aggregated`) and **Type** i.e `User/Domain` (for aggregated events).
{% hint style="info" %}
**Note:**
* Choose the single mode to send individual events
* Choose the aggregate mode to send events in batch/periodically
* For aggregate events - specify the type i.e Domain/User based on whether you want to send events at a domain (company) or user level.
{% endhint %}
{% hint style="info" %}
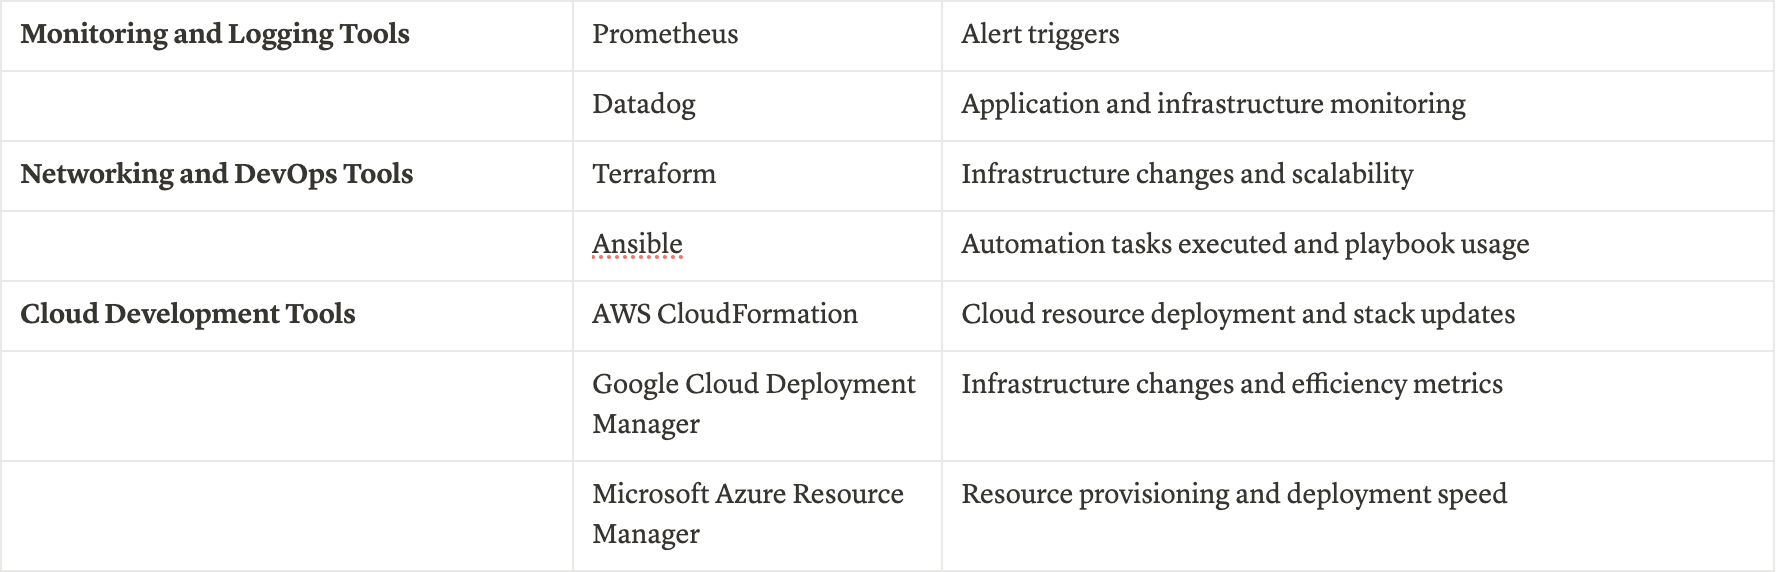
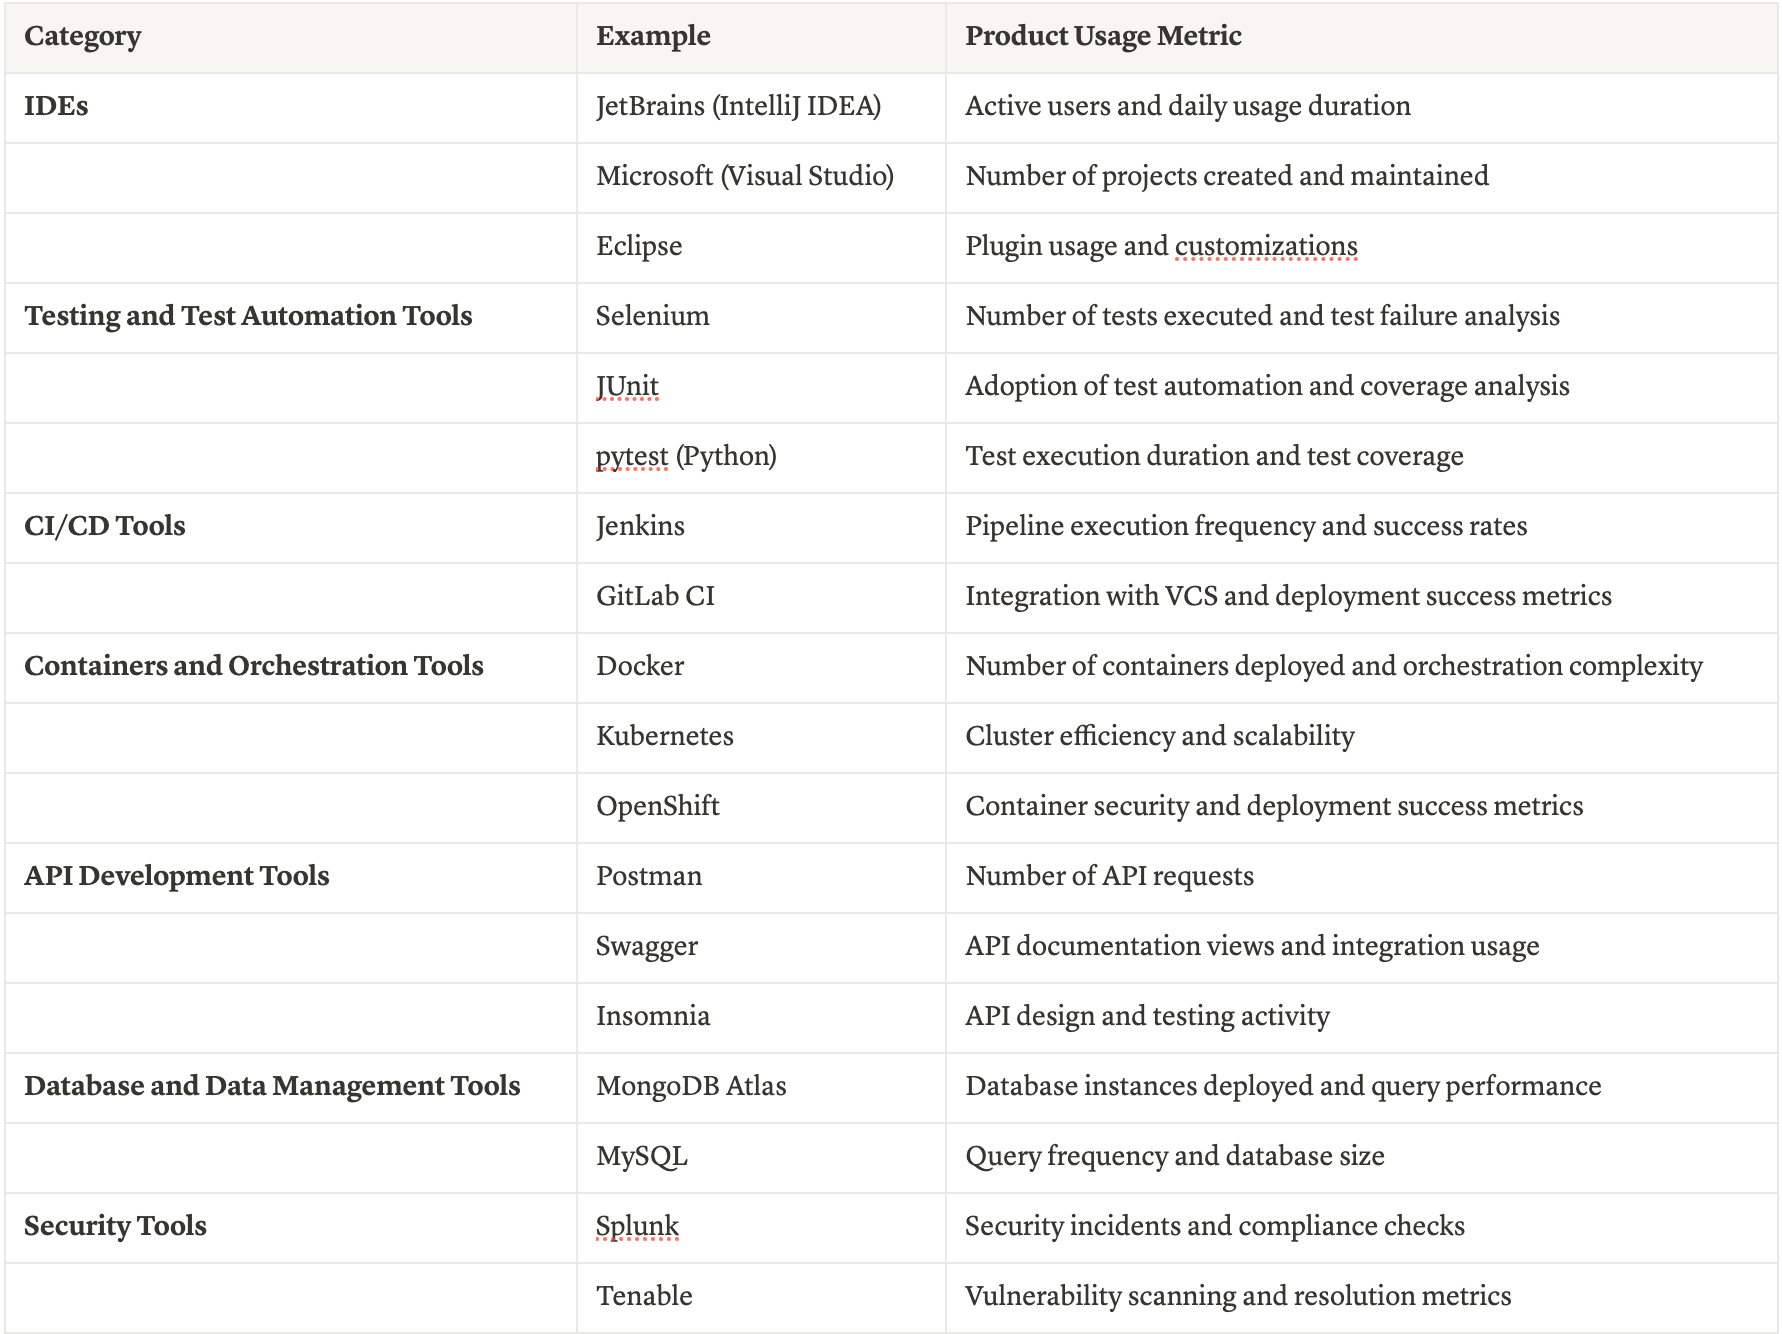
**For Inspiration:** Some popular products in various DevTool categories and their usage metrics are listed [here](broken://pages/HE4aZjrBdvtXUGpJRMiI).
{% endhint %}
***
### **Step 2:** Add Meta Parameters
Admin can now ingest additional attributes in the product usage API along with Activity Type. You need to define the attributes, along with possible values to send via API in the Meta object.
{% hint style="info" %}
Amins need to should send the same attributes in the Meta object as part of the payload
{% endhint %}
1. Configure additional Parameters for each Metric under **Meta Parameters**
2\. Click on Add new to add the Meta Parameters
**Parameter Name**
* Enter a unique parameter key (e.g., `operating_system`).
* Use **only lowercase letters, numbers, and underscores**.
* This key must match the attribute sent in your event payload.
\
**Description**
* Describe what this parameter represents and when it is populated.
* Example: *“The operating system of the system from which the pingback is received.”*
* This helps maintain clarity and consistency across teams.
\
**Choose the Data Type**
* Select **Picklist (Choice list)** when the parameter should only accept predefined values.
* Use this to enforce data consistency and avoid free-form or invalid inputs.
* Add all allowed values for this parameter (e.g., `Windows`, `Linux`).
* Click **Add choice** to include more options.
\
**Save the Parameter**
* Click **Add** to create the meta parameter.
{% hint style="info" %}
**Only parameters defined here and included in the event payload will be captured.**
{% endhint %}
The meta attributes will be added.
Select the bin icon to delete the attribute.
\
**Timeline Event Rendering**
* Each event in the timeline is displayed along with its associated meta attributes.
* For aggregated activity types, the timeline shows the aggregated count instead of individual events.
\
**Segmentation**
* In the Segmentation filters, the available meta activity types are displayed for filtering under Activity > Activity Type > Data API/Data API Meta
After selecting an activity type, the user is prompted to choose the associated meta attribute.
***
### **Step 3: Passing Data via the Product API**
{% hint style="info" %}
**Important:** To effectively leverage Product Usage Metrics, ensure that the metrics are configured correctly in the Product Usage Settings. Once configured, these metrics need to be utilized in tandem with data sent via the **Product API** or **Telemetry Data API** to generate actionable insights. For further steps on passing the data, refer to the guides below:
{% endhint %}
* [API Document for Telemetry Data](https://docs.reo.dev/integrations/input-sources/api-based-integration/telemetry)
* [API Document for Cloud Hosted Products](https://docs.reo.dev/integrations/input-sources/api-based-integration/custom-product-events-api)
These guides will walk you through setting up and sending data using our APIs, including sample payloads and best practices.
***
### **Step 4: Leveraging Metrics in Account/Developer Activity Timeline**
After the data flows into Reo.Dev, the activity logs will display developer actions based on the configured metrics. The timeline will show login activities, page visits, and more, giving you a comprehensive view of developer behaviour.
***
### **Step 5: Creating Segments for High-Intent Accounts**
Reo.Dev allows users to create **custom segments** based on the product usage data. Here’s how:
1. Navigate to the **Segments** section.
2. Choose the **Data API Filter**:
* **Data API Includes**: `WEB_PORTAL_SIGN-UP`
* **Count of Product Metric Greater Than**: 2
This helps surface accounts or developers who meet specific criteria, enabling targeted outreach.

***
### **Data Collected for Product Usage**
#### **Product Usage API**
**Types of Data Collected**
* Personal Information
* Product Usage Information
**Personal Information**
While using our Service, we may ask you to provide us with certain personally identifiable information
* Login ID (email address, GitHub ID, LinkedIN ID, username) used for sign in
* Internet Protocol Address
**Product** **Usage Information**
We may also collect information related to usage of the product
* Browser information (browser type, browser version)
* Login timestamp
* Product Usage Data
* Product ID
* Environment on which product is being used
* Activity information (Activity type, Activity id & event timestamp)
**Use of Data**
* Login ID: For data enrichment to find the organisation of the developer
* IP Address: For company enrichment to find the organisation of the developer
#### **Product Javascript**
**Types of Data Collected**
* Personal Information
* Product Usage Information
* Tracking Information
**Personal Information**
While using our Service, we may ask you to provide us with certain personally identifiable information
* Login ID (email address, GitHub ID, LinkedIN ID, username) used for sign in
* Internet Protocol Address
* Geo Location Coordinates
**Product** **Usage Information**
We may also collect information related to usage of the product
* Browser information (browser type, browser version)
* Login timestamp
* Product Usage Data
* Screen Visited
* Timestamp
* Time spent on each screen
* Activity information (Content Copied,Search,Activity Timestamp)
**Tracking Information**
* Session Cookies: Cookies are files with a small amount of data which may include an anonymous unique identifier. We use cookies to track the users activity on the platform
**Use of Data**
* Login ID: For data enrichment to find the organisation of the developer
* IP Address: For company enrichment to find the organisation of the developer
* Geo-Location Coordinated: To establish the location of the developer
***
## Examples of Product Usage Metrics
Product usage metrics provide valuable insights into how developers engage with your product, helping GTM teams to identify key patterns and optimize the user experience. Below are examples of metrics you can track to measure and enhance product performance.
### **Conclusion**
By configuring custom metrics and leveraging Reo.Dev’s Product API, teams can capture and interpret key developer signals. This capability, combined with segmentation and timeline insights, equips sales and marketing teams with actionable data to drive targeted engagement and conversions.
---
# Agent Instructions
This documentation is published with GitBook. GitBook is the documentation platform designed so that both humans and AI agents can read, navigate, and reason over technical content effectively. Learn more at gitbook.com.
## Querying This Documentation
If you need additional information that is not directly available in this page, you can query the documentation dynamically by asking a question.
Perform an HTTP GET request on the current page URL with the `ask` query parameter, and the optional `goal` query parameter:
```
GET https://docs.reo.dev/configurations/product-usage.md?ask=&goal=
```
`ask` is the immediate question: it should be specific, self-contained, and written in natural language.
`goal` is optional and describes the broader end goal you are ultimately trying to accomplish on behalf of the user. GitBook uses it to tailor the answer towards what is most useful for that goal.
The response will contain a direct answer to the question and relevant excerpts and sources from the documentation.
Use this mechanism when the answer is not explicitly present in the current page, you need clarification or additional context, or you want to retrieve related documentation sections.