> For the complete documentation index, see [llms.txt](https://docs.reo.dev/llms.txt). Markdown versions of documentation pages are available by appending `.md` to page URLs; this page is available as [Markdown](https://docs.reo.dev/agents/intel-columns.md).
# Intel Columns
Intel Columns let you enrich any segment or list with the exact tech-GTM signals you care about, right inside your Accounts view. Instead of running a separate agent and jumping between screens, you describe the signal you want in plain language, and Reo adds it as a new column against every account in your segment or list.
Here's a complete guide on how to add, manage, and filter Intel Columns.
#### What you can add as a column
An Intel Column can answer almost any question you'd ask about your accounts. A few common types:
* **Enrichment signals** like "add the number of DevOps engineers for my list"
* **Qualification signals** like "which companies are doing cloud migration from my list"
Each column is created by an agent, and one agent creates exactly one column. Supporting details, reasoning, and evidence live inside that column and open up when you expand a value. (more on that below)
{% hint style="info" %}
The **Intel Column** feature works on any segment or list, including segments that have been shared with you. It is not currently available on the “**All Accounts”** list or in any segment or list with more than 10,000 accounts.
{% endhint %}
#### Adding a column
**Step 1:** Open the segment or list you want to enrich.
**Step 2:** Click **Add Column** to get started.
This opens the **Add an intel column with AI** modal.
From here, you have a few ways to build your column:
* **Write a prompt:** Describe the signal you want as a column.
* **Choose from an existing prompt:** Select from the three prompts personalized to your workspace if you'd rather start from an example.
* **Add an existing intel column:** Reuse an intel column you already created on another segment or list.
* **Chat with an agent:** Open a conversation to refine exactly what the column should capture.
{% hint style="info" %}
Choose between Reo data and Public data. Reo data draws on Reo's proprietary account signals and is selected by default. Public data searches news, filings, and blogs, so it is the better choice for signals like SOC 2 certifications or SEC filings.
{% endhint %}
#### 1) Prompt to Column
Here's a quick walkthrough on how to add and filter an **Intel Column**:
{% embed url="" %}
**Step 1:** Type your prompt, pick your data source, and click **Add Column**.
**Step 2:** A loading screen walks you through the steps, so you can see how it's reasoning through your request.
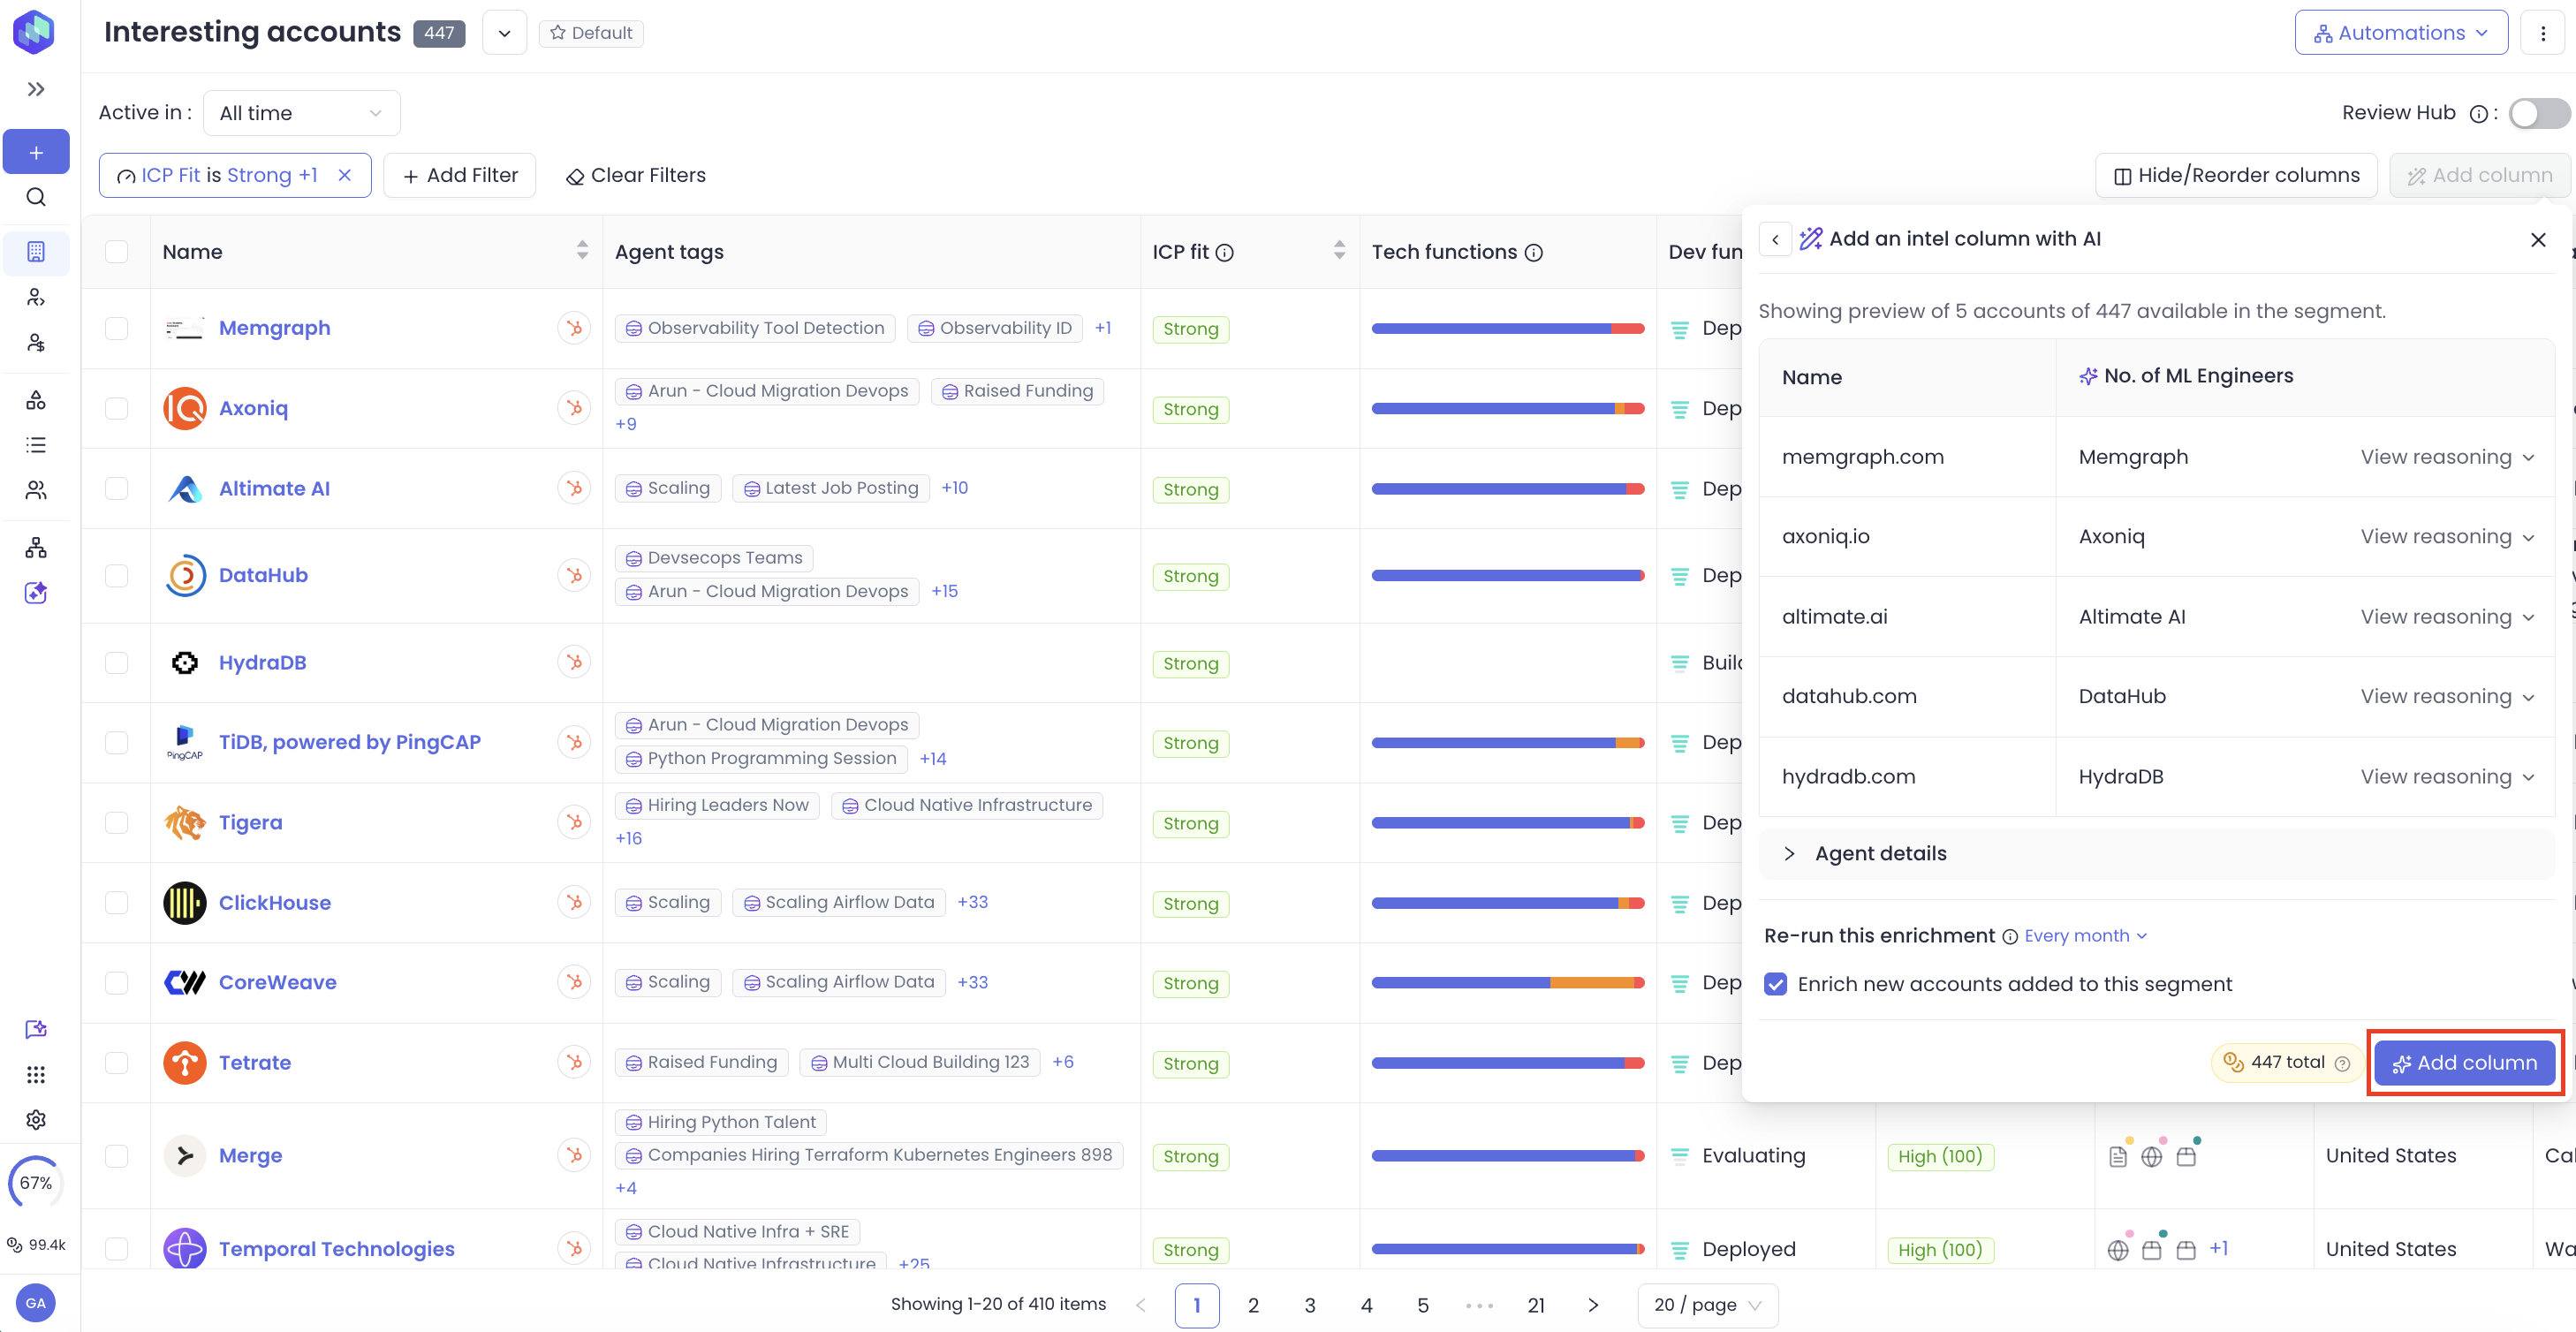
**Step 3:** Review the **Preview & Save** screen. This is where you confirm what's about to be added before any credits are used.
**a. The column.** The agent identifies the single column your prompt is asking for and names it. Column names are set by the agent and are not editable. Any supporting columns, reasoning, and evidence are rolled into this one column and can be opened later from the Accounts list.
**b. Preview and reasoning.** You'll see a sample of up to 5 accounts with the value the agent found for each. Click **View Reasoning** on any row to expand it and read the full reasoning. If the agent can't find data for the signal, you'll see a clear message saying so.
**c. Automations.** Decide how the column stays current:
* **Auto Enrich New Accounts:** Any new account that enters this segment or list gets enriched with this column automatically.
* **Re-enrich All Accounts:** Refreshes the column across all accounts on a schedule. Choose weekly, monthly, quarterly, or do not re-enrich.
**d. Credits estimation.** Reo shows the credits this column will use before you commit.
**Step 4:** Click **Add Column**. You're taken back to the Accounts Listing page and the new column is added as the second column. You'll watch each account enrich in real time.
The column is added to this segment or list only. It won't appear on your other segments automatically, but you can add the same column elsewhere whenever you want (see Add an existing intel column below).
#### 2) Chat with an agent
If you want to shape the column through conversation, click **Chat with agent** from the Add column modal.
This opens the same chat view used across Reo's Agents flows, pre-filled with your current session so you can pick up right where you left off. Keep chatting until the agent understands exactly what you want, then click **Enrich & Add Column**.
You'll land on a **Preview & Save** screen with the column name (not editable), the automation settings, the credits estimation, and a preview of up to 5 accounts showing account name, agent tags, and the pre-filled column values. Here you can also edit the agent name and tag. Click **Enrich & Add Column** and you'll be returned to the segment or list.
{% hint style="info" %}
If you close the chat modal without saving, you'll land back on the previous Preview screen. Nothing is lost.
{% endhint %}
#### 3) Add an existing intel column
If you've already built a column somewhere else, you don't need to recreate it.
**Step 1:** In the Add column modal, choose **Add an existing intel column**. Reo lists every column created across your other segments and lists, showing the column name, the data type of its values, and the agent that created it.
**Step 2:** Pick a column. Reo opens the same Preview & Save screen used in the prompt flow, this time with 5 sample accounts from your current segment so you can see how the column fills here.
**Step 3:** Set your automations (Auto Enrich New Accounts and Re-enrich All Accounts), review the credits estimation, and click **Add Column**. You're redirected back to the segment or list, same as the prompt flow.
#### Credits
You're only charged for accounts where Reo is able to fill in the data. Accounts the agent can't enrich don't cost you credits.
If you add an existing column to a new segment or list, the overlapping accounts are charged again for that new placement.
Reo shows a credits estimation on the Preview & Save screen before you confirm, so there are no surprises.
---
# Agent Instructions
This documentation is published with GitBook. GitBook is the documentation platform designed so that both humans and AI agents can read, navigate, and reason over technical content effectively. Learn more at gitbook.com.
## Querying This Documentation
If you need additional information that is not directly available in this page, you can query the documentation dynamically by asking a question.
Perform an HTTP GET request on the current page URL with the `ask` query parameter, and the optional `goal` query parameter:
```
GET https://docs.reo.dev/agents/intel-columns.md?ask=&goal=
```
`ask` is the immediate question: it should be specific, self-contained, and written in natural language.
`goal` is optional and describes the broader end goal you are ultimately trying to accomplish on behalf of the user. GitBook uses it to tailor the answer towards what is most useful for that goal.
The response will contain a direct answer to the question and relevant excerpts and sources from the documentation.
Use this mechanism when the answer is not explicitly present in the current page, you need clarification or additional context, or you want to retrieve related documentation sections.